
Page 53 - CC 2019 ID Look Inside
P. 53
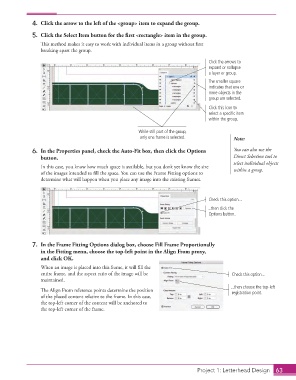
4.  Click the arrow to the left of the <group> item to expand the group.

                  5.  Click the  Select Item button for the fi rst <rectangle> item in the group.
                      Th  is method makes it easy to work with individual items in a group without fi rst
                      breaking apart the group.
                                                                                      Click the arrows to
                                                                                      expand or collapse
                                                                                      a layer or group.
                                                                                      The smaller square
                                                                                      indicates that one or
                                                                                      more objects in the
                                                                                      group are selected.
                                                                                      Click this icon to
                                                                                      select a specific item
                                                                                      within the group.

                                                           While still part of the group,
                                                            only one frame is selected.         Note:

                    6.  In the  Properties panel, check the Auto-Fit box, then click the Options   You can also use the
                      button.                                                                   Direct Selection tool to
                                                                                                select individual objects
                      In this case, you know how much space is available, but you don’t yet know the size   within a group.
                      of the images intended to fi ll the space. You can use the Frame Fitting options to
                      determine what will happen when you place any image into the existing frames.


                                                                                      Check this option...
                                                                                      ...then click the
                                                                                      Options button.


                  7.  In the  Frame Fitting Options dialog box, choose  Fill Frame Proportionally
                      in the Fitting menu, choose the top-left point in the Align From proxy,
                      and click OK.
                      When an image is placed into this frame, it will fi ll the
                      entire frame, and the aspect ratio of the image will be                  Check this option...
                      maintained.
                                                                                               ...then choose the top-left
                      Th  e Align From reference points determine the position                 registration point.
                      of the placed content relative to the frame. In this case,
                      the top-left corner of the content will be anchored to
                      the top-left corner of the frame.


                                                                                    Project 1: Letterhead Design  63