
Page 49 - CC 2019 ID Look Inside
P. 49
7. Click near the top-left corner of the page to place the image.
Every image in an InDesign layout exists in a frame. When you click an empty area of
the page to place an image, the containing frame is automatically created for you.
In the layout, blue handles and frame edges indicate the frame, and not its contents,
is selected on the page; values in the Properties panel relate to the actual containing
frame.
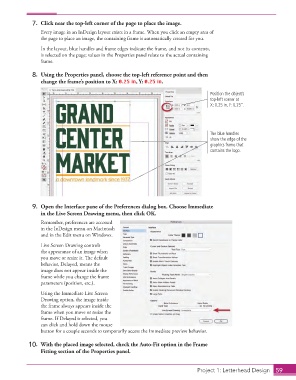
8. Using the Properties panel, choose the top-left reference point and then
change the frame’s position to X: 0.25 in, Y: 0.25 in.
Position the object’s
top-left corner at
X: 0.25 in, Y: 0.25”.
The blue handles
show the edge of the
graphics frame that
contains the logo.
9. Open the Interface pane of the Preferences dialog box. Choose Immediate
in the Live Screen Drawing menu, then click OK.
Remember, preferences are accessed
in the InDesign menu on Macintosh
and in the Edit menu on Windows.
Live Screen Drawing controls
the appearance of an image when
you move or resize it. Th e default
behavior, Delayed, means the
image does not appear inside the
frame while you change the frame
parameters (position, etc.).
Using the Immediate Live Screen
Drawing option, the image inside
the frame always appears inside the
frame when you move or resize the
frame. If Delayed is selected, you
can click and hold down the mouse
button for a couple seconds to temporarily access the Immediate preview behavior.
10. With the placed image selected, check the Auto-Fit option in the Frame
Fitting section of the Properties panel.
Project 1: Letterhead Design 59