


Page 41 - CC2018_AI_Look_Inside
P. 41
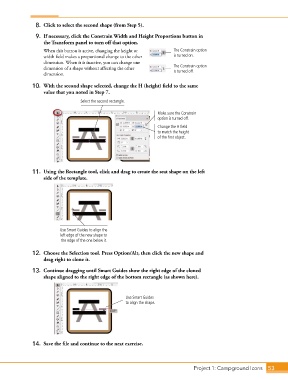
8.  Click to select the second shape (from Step 5).
                9.  If necessary, click the Constrain Width and Height Proportions button in
                   the Transform panel to turn off that option.
                   When this button is active, changing the height or    The Constrain option
                   width field makes a proportional change to the other   is turned on.
                   dimension. When it is inactive, you can change one
                   dimension of a shape without affecting the other      The Constrain option
                                                                         is turned off.
                   dimension.
               10.  With the second shape selected, change the H (height) field to the same
                   value that you noted in Step 7.
                                  Select the second rectangle.

                                                                  Make sure the Constrain
                                                                  option is turned off.
                                                                  Change the H field
                                                                  to match the height
                                                                  of the first object.


               11.  Using the Rectangle tool, click and drag to create the seat shape on the left
                   side of the template.


                          Use Smart Guides to align the
                          left edge of the new shape to
                          the edge of the one below it.

               12.  Choose the Selection tool. Press Option/Alt, then click the new shape and
                   drag right to clone it.

               13.  Continue dragging until Smart Guides show the right edge of the cloned
                   shape aligned to the right edge of the bottom rectangle (as shown here).


                                                     Use Smart Guides
                                                     to align the shape.


               14.  Save the file and continue to the next exercise.


                                                                                 Project 1: Campground Icons    53

