


Page 39 - CC2018_AI_Look_Inside
P. 39
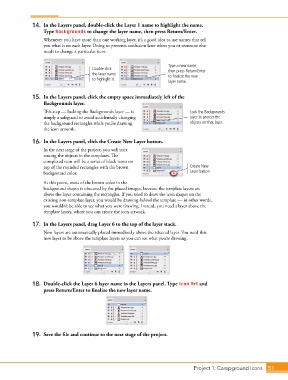
14.  In the Layers panel, double-click the Layer 1 name to highlight the name.
                   Type Backgrounds to change the layer name, then press Return/Enter.

                   Whenever you have more than one working layer, it’s a good idea to use names that tell
                   you what is on each layer. Doing so prevents confusion later when you or someone else
                   needs to change a particular item.


                                                                      Type a new name,
                                       Double-click                   then press Return/Enter
                                       the layer name                 to finalize the new
                                       to highlight it.
                                                                      layer name.

               15.  In the Layers panel, click the empty space immediately left of the
                   Backgrounds layer.
                   This step — locking the Backgrounds layer — is              Lock the Backgrounds
                   simply a safeguard to avoid accidentally changing           layer to protect the
                   the background rectangles while you’re drawing              objects on that layer.
                   the icon artwork.


               16.  In the Layers panel, click the Create New Layer button.
                   In the next stage of the project, you will start
                   tracing the objects in the templates. The
                   completed icon will be a series of black icons on
                   top of the rounded rectangles with the brown                Create New
                   background color.                                           Layer button
                   At this point, most of the brown color in the
                   background shapes is obscured by the placed images, because the template layers are
                   above the layer containing the rectangles. If you tried to draw the icon shapes on the
                   existing non-template layer, you would be drawing behind the template — in other words,
                   you wouldn’t be able to see what you were drawing. Instead, you need a layer above the
                   template layers, where you can create the icon artwork.

               17.  In the Layers panel, drag Layer 6 to the top of the layer stack.
                   New layers are automatically placed immediately above the selected layer. You need this
                   new layer to be above the template layers so you can see what you’re drawing.


               18.  Double-click the Layer 6 layer name in the Layers panel. Type Icon Art and
                   press Return/Enter to finalize the new layer name.


               19.  Save the file and continue to the next stage of the project.


                                                                                 Project 1: Campground Icons    51

