


Page 46 - CC2018_AI_Look_Inside
P. 46
9.  Choose Object>Group.
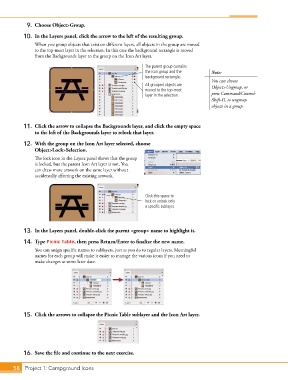
           10.  In the Layers panel, click the arrow to the left of the resulting group.

               When you group objects that exist on different layers, all objects in the group are moved
               to the top-most layer in the selection. In this case the background rectangle is moved
               from the Backgrounds layer to the group on the Icon Art layer.
                                                             The parent group contains
                                                             the icon group and the     Note:
                                                             background rectangle.
                                                                                        You can choose
                                                             All grouped objects are    Object>Ungroup, or
                                                             moved to the top-most
                                                             layer in the selection.    press Command/Control-
                                                                                        Shift-G, to ungroup
                                                                                        objects in a group.


           11.  Click the arrow to collapse the Backgrounds layer, and click the empty space
               to the left of the Backgrounds layer to relock that layer.

           12.  With the group on the Icon Art layer selected, choose
               Object>Lock>Selection.
               The lock icon in the Layers panel shows that the group
               is locked, but the parent Icon Art layer is not. You
               can draw more artwork on the same layer without
               accidentally affecting the existing artwork.


                                                             Click this space to
                                                             lock or unlock only
                                                             a specific sublayer.


           13.  In the Layers panel, double-click the parent <group> name to highlight it.

           14.  Type Picnic Table, then press Return/Enter to finalize the new name.

               You can assign specific names to sublayers, just as you do to regular layers. Meaningful
               names for each group will make it easier to manage the various icons if you need to
               make changes at some later date.


           15.  Click the arrows to collapse the Picnic Table sublayer and the Icon Art layer.


           16.  Save the file and continue to the next exercise.


       58 Project 1: Campground Icons

