


Page 37 - CC2018_AI_Look_Inside
P. 37
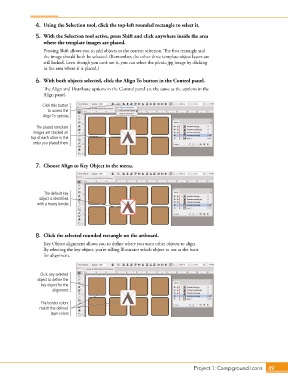
4.  Using the Selection tool, click the top-left rounded rectangle to select it.
                5.  With the Selection tool active, press Shift and click anywhere inside the area
                   where the template images are placed.
                   Pressing Shift allows you to add objects to the current selection. The first rectangle and
                   the image should both be selected. (Remember, the other three template object layers are
                   still locked. Even though you can’t see it, you can select the picnic.jpg image by clicking
                   in the area where it is placed.)

                6.  With both objects selected, click the Align To button in the Control panel.
                   The Align and Distribute options in the Control panel are the same as the options in the
                   Align panel.
                   Click this button
                     to access the
                   Align To options.

                The placed template
               images are stacked on
              top of each other in the
               order you placed them.


                7.  Choose Align to Key Object in the menu.


                   The default key
                 object is identified
                with a heavy border.


                8.  Click the selected rounded rectangle on the artboard.
                   Key Object alignment allows you to define where you want other objects to align.
                   By selecting the key object, you’re telling Illustrator which object to use as the basis
                   for alignment.


                  Click any selected
                object to define the
                  key object for the
                       alignment.

                  The border colors
                 match the defined
                      layer colors.


                                                                                 Project 1: Campground Icons    49

