


Page 67 - CC2018_PS_Look_Inside
P. 67
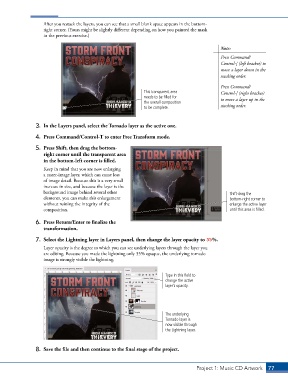
After you restack the layers, you can see that a small blank space appears in the bottom-
                   right corner. (Yours might be slightly different depending on how you painted the mask
                   in the previous exercise.)


                                                                                            Note:
                                                                                            Press Command/
                                                                                            Control-[ (left bracket) to
                                                                                            move a layer down in the
                                                                                            stacking order.

                                                                                            Press Command/
                                                            This transparent area           Control-] (right bracket)
                                                            needs to be filled for          to move a layer up in the
                                                            the overall composition
                                                            to be complete.                 stacking order.


                3.  In the Layers panel, select the Tornado layer as the active one.
                4.  Press Command/Control-T to enter Free Transform mode.

                5.  Press Shift, then drag the bottom-
                   right corner until the transparent area
                   in the bottom-left corner is filled.

                   Keep in mind that you are now enlarging
                   a raster-image layer, which can cause loss
                   of image detail. Because this is a very small
                   increase in size, and because the layer is the
                   background image behind several other                                        Shift-drag the
                   elements, you can make this enlargement                                      bottom-right corner to
                   without ruining the integrity of the                                         enlarge the active layer
                   composition.                                                                 until this area is filled.

                6.  Press Return/Enter to finalize the
                   transformation.

                7.  Select the Lightning layer in Layers panel, then change the layer opacity to 35%.
                   Layer opacity is the degree to which you can see underlying layers through the layer you
                   are editing. Because you made the lightning only 35% opaque, the underlying tornado
                   image is strongly visible the lightning.


                                                                     Type in this field to
                                                                     change the active
                                                                     layer’s opacity.


                                                                     The underlying
                                                                     Tornado layer is
                                                                     now visible through
                                                                     the Lightning layer.


                8.  Save the file and then continue to the final stage of the project.


                                                                                  Project 1: Music CD Artwork   77

