


Page 64 - CC2018_PS_Look_Inside
P. 64
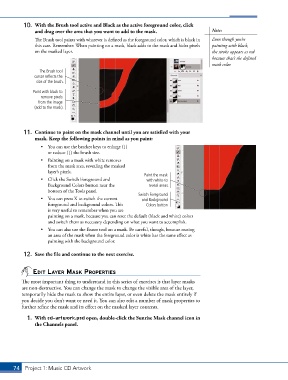
10.  With the Brush tool active and Black as the active foreground color, click
               and drag over the area that you want to add to the mask.                 Note:

               The Brush tool paints with whatever is defined as the foreground color, which is black in   Even though you’re
               this case. Remember: When painting on a mask, black adds to the mask and hides pixels   painting with black,
               on the masked layer.                                                     the stroke appears as red
                                                                                        because that’s the defined
                                                                                        mask color.
                 The Brush tool
               cursor reflects the
                size of the brush.

               Paint with black to
                  remove pixels
                 from the image
               (add to the mask).


           11.  Continue to paint on the mask channel until you are satisfied with your
               mask. Keep the following points in mind as you paint:
                  •  You can use the bracket keys to enlarge (])
                     or reduce ([) the brush size.
                  •  Painting on a mask with white removes
                     from the mask area, revealing the masked
                     layer’s pixels.
                                                             Paint the mask
                  •  Click the Switch Foreground and          with white to
                     Background Colors button near the        reveal areas.
                     bottom of the Tools panel.
                                                          Switch Foreground
                  •  You can press X to switch the current   and Background
                     foreground and background colors. This   Colors button
                     is very useful to remember when you are
                     painting on a mask, because you can reset the default (black and white) colors
                     and switch them as necessary depending on what you want to accomplish.
                  •  You can also use the Eraser tool on a mask. Be careful, though, because erasing
                     an area of the mask when the foreground color is white has the same effect as
                     painting with the background color.


           12.  Save the file and continue to the next exercise.


               EdIt layEr mask propErtIEs

          The most important thing to understand in this series of exercises is that layer masks
          are non-destructive. You can change the mask to change the visible area of the layer,
          temporarily hide the mask to show the entire layer, or even delete the mask entirely if
          you decide you don’t want or need it. You can also edit a number of mask properties to
          further refine the mask and its effect on the masked layer contents.

            1.  With cd-artwork.psd open, double-click the Sunrise Mask channel icon in
               the Channels panel.


       74 Project 1: Music CD Artwork

