


Page 62 - CC2018_PS_Look_Inside
P. 62
EdIt a layEr mask
          If you look closely, the bottom-left corner of the masked image layer includes some of
          the background water because the dark colors are very close to the dark colors in the
          foreground rock. In this exercise, you will use built-in painting tools to manually edit
          the mask and remove the remaining water from the visible layer pixels.
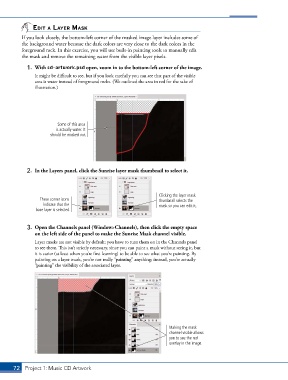
            1.  With cd-artwork.psd open, zoom in to the bottom-left corner of the image.

               It might be difficult to see, but if you look carefully you can see that part of the visible
               area is water instead of foreground rocks. (We outlined the area in red for the sake of
               illustration.)


                         Some of this area
                        is actually water. It
                      should be masked out.


            2.  In the Layers panel, click the Sunrise layer mask thumbnail to select it.


                                                                   Clicking the layer mask
                  These corner icons                               thumbnail selects the
                   indicate that the                               mask so you can edit it.
                base layer is selected.


            3.  Open the Channels panel (Window>Channels), then click the empty space
               on the left side of the panel to make the Sunrise Mask channel visible.

               Layer masks are not visible by default; you have to turn them on in the Channels panel
               to see them. This isn’t strictly necessary, since you can paint a mask without seeing it, but
               it is easier (at least when you’re first learning) to be able to see what you’re painting. By
               painting on a layer mask, you’re not really “painting” anything; instead, you’re actually
               “painting” the visibility of the associated layer.


                                                                       Making the mask
                                                                       channel visible allows
                                                                       you to see the red
                                                                       overlay in the image.


       72 Project 1: Music CD Artwork

