


Page 65 - CC2018_PS_Look_Inside
P. 65
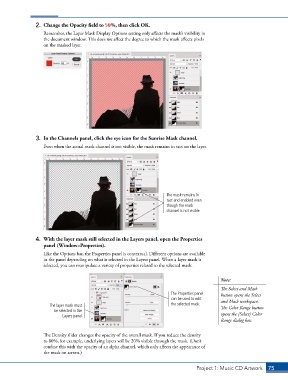
2.  Change the Opacity field to 50%, then click OK.
                   Remember, the Layer Mask Display Options setting only affects the mask’s visibility in
                   the document window. This does not affect the degree to which the mask affects pixels
                   on the masked layer.


                3.  In the Channels panel, click the eye icon for the Sunrise Mask channel.
                   Even when the actual mask channel is not visible, the mask remains in tact on the layer.


                                                                      The mask remains in
                                                                      tact and enabled even
                                                                      though the mask
                                                                      channel is not visible.


                4.  With the layer mask still selected in the Layers panel, open the Properties
                   panel (Window>Properties).
                   Like the Options bar, the Properties panel is contextual. Different options are available
                   in the panel depending on what is selected in the Layers panel. When a layer mask is
                   selected, you can manipulate a variety of properties related to the selected mask.

                                                                                            Note:

                                                                                            The Select and Mask
                                                                        The Properties panel   button opens the Select
                                                                        can be used to edit   and Mask workspace.
                      The layer mask must                               the selected mask.  The Color Range button
                       be selected in the
                           Layers panel.                                                    opens the [Select] Color
                                                                                            Range dialog box.


                   The Density slider changes the opacity of the overall mask. If you reduce the density
                   to 80%, for example, underlying layers will be 20% visible through the mask. (Don’t
                   confuse this with the opacity of an alpha channel, which only affects the appearance of
                   the mask on screen.)


                                                                                  Project 1: Music CD Artwork   75

