


Page 63 - CC2018_PS_Look_Inside
P. 63
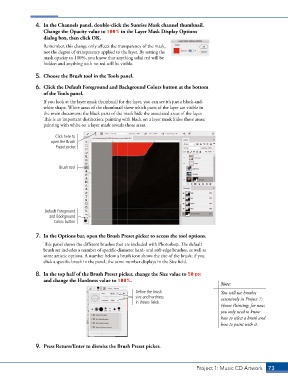
4.  In the Channels panel, double-click the Sunrise Mask channel thumbnail.
                   Change the Opacity value to 100% in the Layer Mask Display Options
                   dialog box, then click OK.
                   Remember, this change only affects the transparency of the mask,
                   not the degree of transparency applied to the layer. By setting the
                   mask opacity to 100%, you know that anything solid red will be
                   hidden and anything with no red will be visible.

                5.  Choose the Brush tool in the Tools panel.

                6.  Click the Default Foreground and Background Colors button at the bottom
                   of the Tools panel.
                   If you look at the layer mask thumbnail for the layer, you can see it’s just a black-and-
                   white shape. White areas of the thumbnail show which parts of the layer are visible in
                   the main document; the black parts of the mask hide the associated areas of the layer.
                   This is an important distinction: painting with black on a layer mask hides those areas;
                   painting with white on a layer mask reveals those areas.

                        Click here to
                      open the Brush
                        Preset picker.


                         Brush tool


                   Default Foreground
                     and Background
                       Colors button


                7.  In the Options bar, open the Brush Preset picker to access the tool options.
                   This panel shows the different brushes that are included with Photoshop. The default
                   brush set includes a number of specific-diameter hard- and soft-edge brushes, as well as
                   some artistic options. A number below a brush icon shows the size of the brush; if you
                   click a specific brush in the panel, the same number displays in the Size field.

                8.  In the top half of the Brush Preset picker, change the Size value to 50 px
                   and change the Hardness value to 100%.
                                                                                            Note:
                                                         Define the brush                   You will use brushes
                                                         size and hardness                  extensively in Project 7:
                                                         in theses fields.
                                                                                            House Painting; for now,
                                                                                            you only need to know
                                                                                            how to select a brush and
                                                                                            how to paint with it.


                9.  Press Return/Enter to dismiss the Brush Preset picker.


                                                                                  Project 1: Music CD Artwork   73

