


Page 26 - CS6_ID_Look_Inside
P. 26
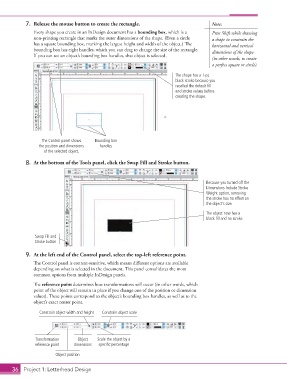
7.  Release the mouse button to create the rectangle.                       Note:
                    Every shape you create in an InDesign document has a bounding box, which is a   Press Shift while drawing
                    non-printing rectangle that marks the outer dimensions of the shape. (Even a circle   a shape to constrain the
                    has a square bounding box, marking the largest height and width of the object.) The   horizontal and vertical
                    bounding box has eight handles, which you can drag to change the size of the rectangle.   dimensions of the shape
                    If you can see an object’s bounding box handles, that object is selected.
                                                                                             (in other words, to create
                                                                                             a perfect square or circle).

                                                                              The shape has a 1-pt
                                                                              black stroke because you
                                                                              recalled the default fill
                                                                              and stroke values before
                                                                              creating the shape.


                        The Control panel shows   Bounding box
                      the position and dimensions   handles
                        of the selected object.

                 8.  At the bottom of the Tools panel, click the Swap Fill and Stroke button.


                                                                                           Because you turned off the
                                                                                           Dimensions Include Stroke
                                                                                           Weight option, removing
                                                                                           the stroke has no effect on
                                                                                           the object’s size.
                                                                                           The object now has a
                                                                                           black fill and no stroke.


                     Swap Fill and
                     Stroke button


                 9.  At the left end of the Control panel, select the top-left reference point.
                    The Control panel is context-sensitive, which means different options are available
                    depending on what is selected in the document. This panel consolidates the most
                    common options from multiple InDesign panels.
                    The reference point determines how transformations will occur (in other words, which
                    point of the object will remain in place if you change one of the position or dimension
                    values). These points correspond to the object’s bounding box handles, as well as to the
                    object’s exact center point.
                       Constrain object width and height  Constrain object scale


                     Transformation   Object  Scale the object by a
                     reference point   dimensions  specific percentage
                             Object position


           36 Project 1: Letterhead Design

