


Page 31 - CS6_ID_Look_Inside
P. 31
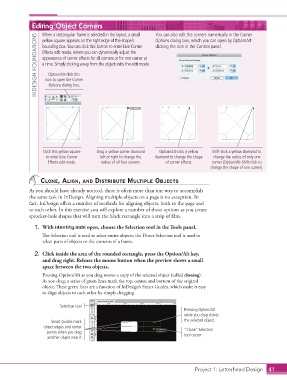
Editing Object Corners                            You can also edit the corners numerically in the Corner

                        When a rectangular frame is selected in the layout, a small
                     INDESIGN FOUNDATIONS  bounding box. You can click this button to enter Live Corner   clicking the icon in the Control panel.
                        yellow square appears on the right edge of the shape’s
                                                                      Options dialog box, which you can open by Option/Alt
                        Effects edit mode, where you can dynamically adjust the
                        appearance of corner effects for all corners or for one corner at
                        a time. Simply clicking away from the object exits the edit mode.

                          Option/Alt-click this
                         icon to open the Corner
                          Options dialog box.


                        Click this yellow square   Drag a yellow corner diamond   Option/Alt-click a yellow   Shift-click a yellow diamond to
                         to enter Live Corner   left or right to change the   diamond to change the shape   change the radius of only one
                          Effects edit mode.    radius of all four corners.  of corner effects.  corner (Option/Alt-Shift-click to
                                                                                             change the shape of one corner).

                       clone, align, and distriBute multiPle oBjects
                  As you should have already noticed, there is often more than one way to accomplish
                  the same task in InDesign. Aligning multiple objects on a page is no exception. In
                  fact, InDesign offers a number of methods for aligning objects, both to the page and
                  to each other. In this exercise you will explore a number of those options as you create
                  sprocket-hole shapes that will turn the black rectangle into a strip of film.

                    1.  With identity.indd open, choose the Selection tool in the Tools panel.
                        The Selection tool is used to select entire objects; the Direct Selection tool is used to
                        select parts of objects or the contents of a frame.

                    2.  Click inside the area of the rounded rectangle, press the Option/Alt key,
                        and drag right. Release the mouse button when the preview shows a small
                        space between the two objects.
                        Pressing Option/Alt as you drag moves a copy of the selected object (called cloning).
                        As you drag, a series of green lines mark the top, center, and bottom of the original
                        object. These green lines are a function of InDesign’s Smart Guides, which make it easy
                        to align objects to each other by simply dragging.


                               Selection tool
                                                                                  Pressing Option/Alt
                                                                                  while you drag clones
                           Smart Guides mark                                      the selected object.
                        object edges and center
                          points when you drag                                    “Clone” Selection
                                                                                  tool cursor
                          another object near it.


                                                                                      Project 1: Letterhead Design  41

