


Page 21 - CS6_ID_Look_Inside
P. 21
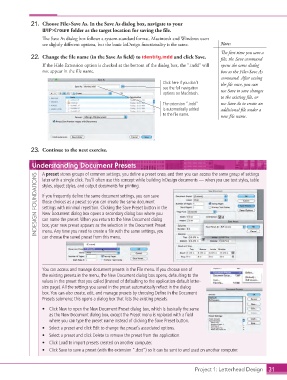
21.  Choose File>Save As. In the Save As dialog box, navigate to your
                        WIP>Crowe folder as the target location for saving the file.
                        The Save As dialog box follows a system-standard format. Macintosh and Windows users
                        see slightly different options, but the basic InDesign functionality is the same.  Note:
                                                                                                 The first time you save a
                   22.  Change the file name (in the Save As field) to identity.indd and click Save.   file, the Save command
                        If the Hide Extension option is checked at the bottom of the dialog box, the ".indd" will   opens the same dialog
                        not appear in the file name.                                             box as the File>Save As
                                                                                                 command. After saving
                                                                         Click here if you don’t   the file once, you can
                                                                         see the full navigation   use Save to save changes
                                                                         options on Macintosh.
                                                                                                 to the existing file, or
                                                                         The extension “.indd”   use Save As to create an
                                                                         is automatically added   additional file under a
                                                                         to the file name.       new file name.


                   23.  Continue to the next exercise.

                    Understanding Document Presets

                        A preset stores groups of common settings; you define a preset once, and then you can access the same group of settings
                     INDESIGN FOUNDATIONS  styles, object styles, and output documents for printing.
                        later with a single click. You’ll often use this concept while building InDesign documents — when you use text styles, table


                        If you frequently define the same document settings, you can save
                        those choices as a preset so you can create the same document
                        settings with minimal repetition. Clicking the Save Preset button in the
                        New Document dialog box opens a secondary dialog box where you
                        can name the preset. When you return to the New Document dialog
                        box, your new preset appears as the selection in the Document Preset
                        menu. Any time you need to create a file with the same settings, you
                        can choose the saved preset from this menu.


                        You can access and manage document presets in the File menu. If you choose one of
                        the existing presets in the menu, the New Document dialog box opens, defaulting to the
                        values in the preset that you called (instead of defaulting to the application-default letter-
                        size page). All the settings you saved in the preset automatically reflect in the dialog
                        box. You can also create, edit, and manage presets by choosing Define in the Document
                        Presets submenu; this opens a dialog box that lists the existing presets.

                        •  Click New to open the New Document Preset dialog box, which is basically the same
                           as the New Document dialog box, except the Preset menu is replaced with a field
                           where you can type the preset name instead of clicking the Save Preset button.
                        •  Select a preset and click Edit to change the preset’s associated options.
                        •  Select a preset and click Delete to remove the preset from the application.
                        •  Click Load to import presets created on another computer.
                        •  Click Save to save a preset (with the extension “.dcst”) so it can be sent to and used on another computer.


                                                                                      Project 1: Letterhead Design  31

