


Page 41 - CC2018_ID_Look_Inside
P. 41
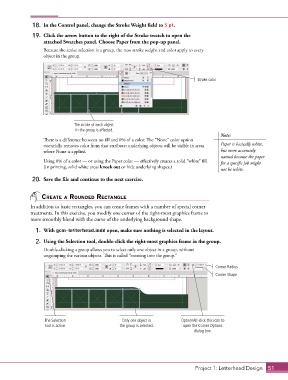
18.  In the Control panel, change the Stroke Weight field to 3 pt.
               19.  Click the arrow button to the right of the Stroke swatch to open the
                   attached Swatches panel. Choose Paper from the pop-up panel.
                   Because the active selection is a group, the new stroke weight and color apply to every
                   object in the group.


                                                                                   Stroke color


                                The stroke of each object
                                in the group is affected.
                                                                                            Note:
                   There is a difference between no fill and 0% of a color. The “None” color option
                   essentially removes color from that attribute; underlying objects will be visible in areas   Paper is basically white,
                   where None is applied.                                                   but more accurately
                                                                                            named because the paper
                   Using 0% of a color — or using the Paper color — effectively creates a solid “white” fill.   for a specific job might
                   (In printing, solid white areas knock out or hide underlying shapes.)
                                                                                            not be white.
               20.  Save the file and continue to the next exercise.


                  CreAte A rounded reCtAngle
              In addition to basic rectangles, you can create frames with a number of special corner
              treatments. In this exercise, you modify one corner of the right-most graphics frame to
              more smoothly blend with the curve of the underlying background shape.
                1.  With gcm-letterhead.indd open, make sure nothing is selected in the layout.

                2.  Using the Selection tool, double-click the right-most graphics frame in the group.

                   Double-clicking a group allows you to select only one object in a group, without
                   ungrouping the various objects. This is called “entering into the group.”

                                                                                          Corner Radius
                                                                                          Corner Shape


                    The Selection                  Only one object in       Option/Alt-click this icon to
                    tool is active.               the group is selected.     open the Corner Options
                                                                                 dialog box.


                                                                                  Project 1: Letterhead Design  51

