


Page 31 - CC2018_AI_Look_Inside
P. 31
Understanding Alignment Options

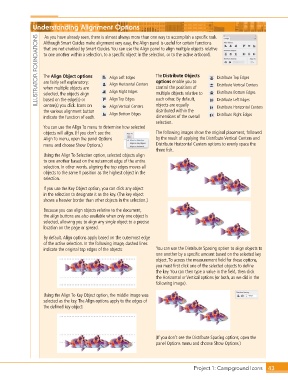
                    As you have already seen, there is almost always more than one way to accomplish a specific task.
                ILLUSTRATOR FOUNDATIONS  to one another within a selection, to a specific object in the selection, or to the active artboard.   Distribute Top Edges
                   Although Smart Guides make alignment very easy, the Align panel is useful for certain functions
                   that are not enabled by Smart Guides. You can use the Align panel to align multiple objects relative


                                                                 The Distribute Objects
                   The Align Object options
                                              Align Left Edges
                                                                 options enable you to
                   are fairly self explanatory;
                                              Align Horizontal Centers
                                                                                           Distribute Vertical Centers
                                                                 control the positions of
                   when multiple objects are
                   selected, the objects align
                                                                 each other. By default,
                                              Align Top Edges
                   based on the edge(s) or
                                                                                           Distribute Left Edges
                                                                 objects are equally
                   center(s) you click. Icons on
                                              Align Vertical Centers
                                                                                           Distribute Horizontal Centers
                                                                 distributed within the
                   the various alignment button   Align Right Edges  multiple objects relative to   Distribute Bottom Edges
                                              Align Bottom Edges
                   indicate the function of each.                dimensions of the overall   Distribute Right Edges
                                                                 selection.
                   You can use the Align To menu to determine how selected
                   objects will align. (If you don’t see the     The following images show the original placement, followed
                   Align To menu, open the panel Options         by the result of applying the Distribute Vertical Centers and
                   menu and choose Show Options.)                Distribute Horizontal Centers options to evenly space the
                                                                 three fish.
                   Using the Align To Selection option, selected objects align
                   to one another based on the outermost edge of the entire
                   selection. In other words, aligning the top edges moves all
                   objects to the same Y position as the highest object in the
                   selection.
                   If you use the Key Object option, you can click any object
                   in the selection to designate it as the key. (The key object
                   shows a heavier border than other objects in the selection.)
                   Because you can align objects relative to the document,
                   the align buttons are also available when only one object is
                   selected, allowing you to align any single object to a precise
                   location on the page or spread.
                   By default, Align options apply based on the outermost edge
                   of the active selection. In the following image, dashed lines
                   indicate the original top edges of the objects:  You can use the Distribute Spacing option to align objects to
                                                                 one another by a specific amount based on the selected key
                                                                 object. To access the measurement field for these options,
                                                                 you must first click one of the selected objects to define
                                                                 the key. You can then type a value in the field, then click
                                                                 the Horizontal or Vertical options (or both, as we did in the
                                                                 following image).

                   Using the Align To Key Object option, the middle image was
                   selected as the key. The Align options apply to the edges of
                   the defined key object:


                                                                 (If you don’t see the Distribute Spacing options, open the
                                                                 panel Options menu and choose Show Options.)


                                                                                 Project 1: Campground Icons    43

