


Page 30 - CC2018_AI_Look_Inside
P. 30
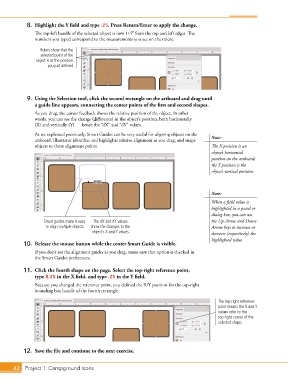
8. Highlight the Y field and type .25. Press Return/Enter to apply the change.
The top-left handle of the selected object is now 1/4 from the top and left edges. The
numbers you typed correspond to the measurements you see on the rulers.
Rulers show that the
selected point of the
object is at the position
you just defined.
9. Using the Selection tool, click the second rectangle on the artboard and drag until
a guide line appears, connecting the center points of the first and second shapes.
As you drag, the cursor feedback shows the relative position of the object. In other
words, you can see the change (difference) in the object’s position, both horizontally
(X) and vertically (Y) — hence the “dX” and “dY” values.
As we explained previously, Smart Guides can be very useful for aligning objects on the Note:
artboard. Illustrator identifies and highlights relative alignment as you drag, and snaps
objects to those alignment points. The X position is an
object’s horizontal
position on the artboard;
the Y position is the
object’s vertical position.
Note:
When a field value is
highlighted in a panel or
dialog box, you can use
Smart guides make it easy The dX and dY values the Up Arrow and Down
to align multiple objects. show the changes to the Arrow keys to increase or
object’s X and Y values. decrease (respectively) the
highlighted value.
10. Release the mouse button while the center Smart Guide is visible.
If you don’t see the alignment guides as you drag, make sure that option is checked in
the Smart Guides preferences.
11. Click the fourth shape on the page. Select the top-right reference point,
type 8.25 in the X field, and type .25 in the Y field.
Because you changed the reference point, you defined the X/Y position for the top-right
bounding box handle of the fourth rectangle.
The top-right reference
point means the X and Y
values refer to the
top-right corner of the
selected shape.
12. Save the file and continue to the next exercise.
42 Project 1: Campground Icons

