


Page 41 - CC2018_WD_Look_Inside
P. 41
Stage 2 Managing Layers


              When you composite images into a cohesive design, you almost certainly need to manipulate and
              transform some of the layers to make all of the pieces work together. Photoshop includes a number
              of options for managing layers: naming layers for easier recognition, creating layer groups so multiple
              layers can be manipulated at once, moving layers around on the canvas, transforming layers both
              destructively and non-destructively, controlling individual layer visibility, and arranging the top-to-
              bottom stacking order of layers to determine exactly what is visible. You will use all of these options in
              this stage of the project.


                  nAme lAyers And lAyer groups
              It’s always a good idea to name your layers because it makes managing the file much
              easier — especially when you work with files that include dozens of layers. Even with
              only four unnamed layers in this file (counting the Background layer), it would be
              tedious to have to toggle each layer on to find the one you want.

                1.  With aftermath.psd open, review the Layers panel.

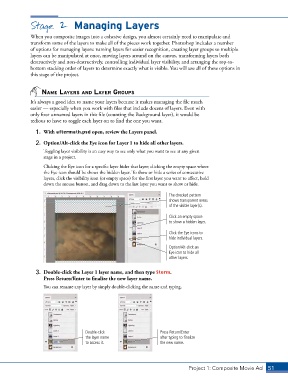
                2.  Option/Alt-click the Eye icon for Layer 1 to hide all other layers.
                   Toggling layer visibility is an easy way to see only what you want to see at any given
                   stage in a project.
                   Clicking the Eye icon for a specific layer hides that layer; clicking the empty space where
                   the Eye icon should be shows the hidden layer. To show or hide a series of consecutive
                   layers, click the visibility icon (or empty space) for the first layer you want to affect, hold
                   down the mouse button, and drag down to the last layer you want to show or hide.

                                                                       The checked pattern
                                                                       shows transparent areas
                                                                       of the visible layer(s).

                                                                       Click an empty space
                                                                       to show a hidden layer.

                                                                       Click the Eye icons to
                                                                       hide individual layers.
                                                                       Option/Alt-click an
                                                                       Eye icon to hide all
                                                                       other layers.

                3.  Double-click the Layer 1 layer name, and then type Storm.
                   Press Return/Enter to finalize the new layer name.
                   You can rename any layer by simply double-clicking the name and typing.


                                    Double-click                   Press Return/Enter
                                    the layer name                 after typing to finalize
                                    to access it.                  the new name.


                                                                               Project 1: Composite Movie Ad    51

