


Page 37 - CC2018_WD_Look_Inside
P. 37
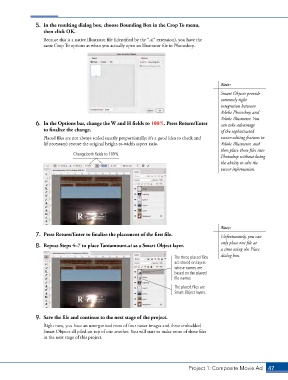
5.  In the resulting dialog box, choose Bounding Box in the Crop To menu,
                   then click OK.

                   Because this is a native Illustrator file (identified by the “.ai” extension), you have the
                   same Crop To options as when you actually open an Illustrator file in Photoshop.


                                                                                            Note:
                                                                                            Smart Objects provide
                                                                                            extremely tight
                                                                                            integration between
                                                                                            Adobe Photoshop and
                                                                                            Adobe Illustrator. You
                6.  In the Options bar, change the W and H fields to 100%. Press Return/Enter   can take advantage
                   to finalize the change.                                                  of the sophisticated
                   Placed files are not always scaled exactly proportionally; it’s a good idea to check and   vector-editing features in
                   (if necessary) restore the original height-to-width aspect ratio.        Adobe Illustrator, and
                                                                                            then place those files into
                               Change both fields to 100%.
                                                                                            Photoshop without losing
                                                                                            the ability to edit the
                                                                                            vector information.


                                                                                            Note:
                7.  Press Return/Enter to finalize the placement of the first file.         Unfortunately, you can
                                                                                            only place one file at
                8.  Repeat Steps 4–7 to place Tantamount.ai as a Smart Object layer.
                                                                                            a time using the Place
                                                                                            dialog box.
                                                                         The three placed files
                                                                         are stored on layers
                                                                         whose names are
                                                                         based on the placed
                                                                         file names.
                                                                         The placed files are
                                                                         Smart Object layers.


                9.  Save the file and continue to the next stage of the project.
                   Right now, you have an unorganized mess of four raster images and three embedded
                   Smart Objects all piled on top of one another. You will start to make sense of these files
                   in the next stage of this project.


                                                                               Project 1: Composite Movie Ad    47

