


Page 19 - CC2018_WD_Look_Inside
P. 19
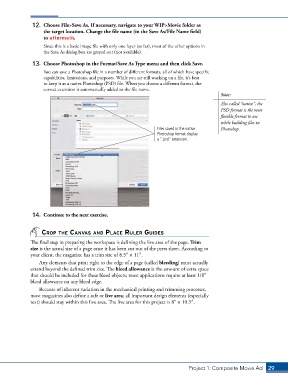
12.  Choose File>Save As. If necessary, navigate to your WIP>Movie folder as
                   the target location. Change the file name (in the Save As/File Name field)
                   to aftermath.
                   Since this is a basic image file with only one layer (so far), most of the other options in
                   the Save As dialog box are grayed out (not available).

               13.  Choose Photoshop in the Format/Save As Type menu and then click Save.
                   You can save a Photoshop file in a number of different formats, all of which have specific
                   capabilities, limitations, and purposes. While you are still working on a file, it’s best
                   to keep it as a native Photoshop (PSD) file. When you choose a different format, the
                   correct extension is automatically added to the file name.
                                                                                            Note:
                                                                                            Also called “native”, the
                                                                                            PSD format is the most
                                                                                            flexible format to use
                                                                                            while building files in
                                                                  Files saved in the native    Photoshop.
                                                                  Photoshop format display
                                                                  a “.psd” extension.


               14.  Continue to the next exercise.


                  Crop the CAnvAs And plACe ruler guides

              The final step in preparing the workspace is defining the live area of the page. Trim
              size is the actual size of a page once it has been cut out of the press sheet. According to
              your client, the magazine has a trim size of 8.53 1 113.
                 Any elements that print right to the edge of a page (called bleeding) must actually
              extend beyond the defined trim size. The bleed allowance is the amount of extra space
              that should be included for these bleed objects; most applications require at least 1/83
              bleed allowance on any bleed edge.
                 Because of inherent variation in the mechanical printing and trimming processes,
              most magazines also define a safe or live area; all important design elements (especially
              text) should stay within this live area. The live area for this project is 83 1 10.53.


                                                                               Project 1: Composite Movie Ad    29

