


Page 26 - CC2017_WD_Look_Inside
P. 26
4.  Click the parchment window to activate that file.
               Like the file you created, this file has only one layer — Background. Every scan and
               digital photograph has this characteristic.

            5.  With nothing selected, choose the Move tool at the top of the Tools panel.

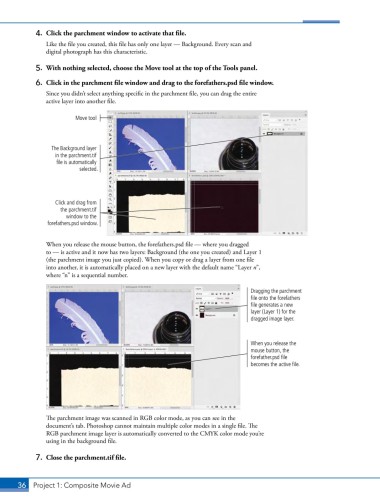
            6.  Click in the parchment file window and drag to the forefathers.psd file window.

               Since you didn’t select anything specific in the parchment file, you can drag the entire
               active layer into another file.

                         Move tool


                 The Background layer
                  in the parchment.tif
                   file is automatically
                          selected.


                  Click and drag from
                    the parchment.tif
                      window to the
                forefathers.psd window.


               When you release the mouse button, the forefathers.psd file — where you dragged
               to — is active and it now has two layers: Background (the one you created) and Layer 1
               (the parchment image you just copied). When you copy or drag a layer from one file
               into another, it is automatically placed on a new layer with the default name “Layer n”,
               where “n” is a sequential number.

                                                                               Dragging the parchment
                                                                               file onto the forefathers
                                                                               file generates a new
                                                                               layer (Layer 1) for the
                                                                               dragged image layer.


                                                                               When you release the
                                                                               mouse button, the
                                                                               forefather.psd file
                                                                               becomes the active file.


               The parchment image was scanned in RGB color mode, as you can see in the
               document’s tab. Photoshop cannot maintain multiple color modes in a single file. The
               RGB parchment image layer is automatically converted to the CMYK color mode you’re
               using in the background file.

            7.  Close the parchment.tif file.


       36 Project 1: Composite Movie Ad

