
Page 38 - CC 2019 GD Look Inside
P. 38
Manage Multiple Layers
When you create artwork in Illustrator, you almost always end up with more than
one object on the artboard. In many cases, a completed fi le has dozens or hundreds
of objects, arranged in specifi c order on top of one another. As fi les become more and
more complex, it can be diffi cult to fi nd and work with exactly the pieces you need.
Illustrator layers are one of the most powerful tools available for solving this problem.
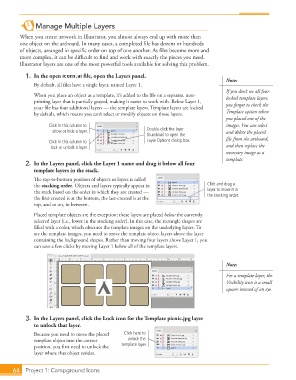
1. In the open icons.ai fi le, open the Layers panel.
Note:
By default, all fi les have a single layer, named Layer 1.
If you don’t see all four
When you place an object as a template, it’s added to the fi le on a separate, non- locked template layers,
printing layer that is partially grayed, making it easier to work with. Below Layer 1,
your fi le has four additional layers — the template layers. Template layers are locked you forgot to check the
by default, which means you can’t select or modify objects on those layers. Template option when
you placed one of the
Click in this column to images. You can select
show or hide a layer. Double-click the layer and delete the placed
thumbnail to open the
Click in this column to Layer Options dialog box. fi le from the artboard,
lock or unlock a layer. and then replace the
necessary image as a
template.
2. In the Layers panel, click the Layer 1 name and drag it below all four
template layers in the stack.
Th e top-to-bottom position of objects or layers is called
the stacking order. Objects and layers typically appear in Click and drag a
the stack based on the order in which they are created — layer to move it in
the fi rst-created is at the bottom, the last-created is at the the stacking order.
top, and so on, in between.
Placed template objects are the exception; these layers are placed below the currently
selected layer (i.e., lower in the stacking order). In this case, the rectangle shapes are
fi lled with a color, which obscures the template images on the underlying layers. To
see the template images, you need to move the template object layers above the layer
containing the background shapes. Rather than moving four layers above Layer 1, you
can save a few clicks by moving Layer 1 below all of the template layers.
Note:
For a template layer, the
Visibility icon is a small
square instead of an eye.
3. In the Layers panel, click the Lock icon for the Template picnic.jpg layer
to unlock that layer.
Because you need to move the placed Click here to
template object into the correct unlock the
position, you fi rst need to unlock the template layer.
layer where that object resides.
64 Project 1: Campground Icons