


Page 46 - CS6_PS_Look_Inside
P. 46
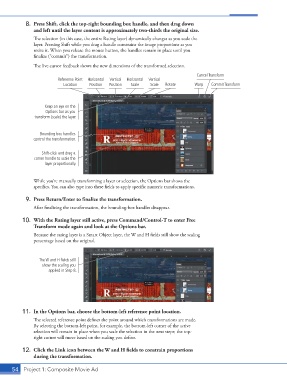
8.  Press Shift, click the top-right bounding box handle, and then drag down
                    and left until the layer content is approximately two-thirds the original size.
                    The selection (in this case, the entire Rating layer) dynamically changes as you scale the
                    layer. Pressing Shift while you drag a handle constrains the image proportions as you
                    resize it. When you release the mouse button, the handles remain in place until you
                    finalize (“commit”) the transformation.
                    The live cursor feedback shows the new dimensions of the transformed selection.

                                                                                       Cancel Transform
                              Reference Point   Horizontal   Vertical   Horizontal  Vertical
                                Location   Position  Position  Scale  Scale  Rotate   Warp   Commit Transform


                         Keep an eye on the
                         Options bar as you
                     transform (scale) the layer.


                       Bounding box handles
                    control the transformation.


                        Shift-click and drag a
                    corner handle to scale the
                         layer proportionally.


                    While you’re manually transforming a layer or selection, the Options bar shows the
                    specifics. You can also type into these fields to apply specific numeric transformations.


                 9.  Press Return/Enter to finalize the transformation.
                    After finalizing the transformation, the bounding-box handles disappear.

                10.  With the Rating layer still active, press Command/Control-T to enter Free
                    Transform mode again and look at the Options bar.

                    Because the rating layer is a Smart Object layer, the W and H fields still show the scaling
                    percentage based on the original.


                      The W and H fields still
                        show the scaling you
                          applied in Step 8.


                11.  In the Options bar, choose the bottom-left reference point location.
                    The selected reference point defines the point around which transformations are made.
                    By selecting the bottom-left point, for example, the bottom-left corner of the active
                    selection will remain in place when you scale the selection in the next steps; the top-
                    right corner will move based on the scaling you define.

                12.  Click the Link icon between the W and H fields to constrain proportions
                    during the transformation.

           54 Project 1: Composite Movie Ad

