


Page 44 - CS6_PS_Look_Inside
P. 44
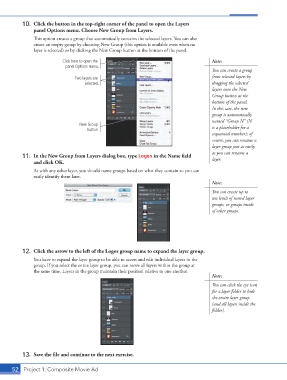
10.  Click the button in the top-right corner of the panel to open the Layers
                    panel Options menu. Choose New Group from Layers.
                    This option creates a group that automatically contains the selected layers. You can also
                    create an empty group by choosing New Group (this option is available even when no
                    layer is selected) or by clicking the New Group button at the bottom of the panel.
                                Click here to open the                                       Note:
                                 panel Options menu.
                                                                                             You can create a group
                                     Two layers are                                          from selected layers by
                                         selected.                                           dragging the selected
                                                                                             layers onto the New
                                                                                             Group button at the
                                                                                             bottom of the panel.
                                                                                             In this case, the new
                                                                                             group is automatically
                                                                                             named “Group N” (N
                                       New Group                                             is a placeholder for a
                                          button
                                                                                             sequential number); of
                                                                                             course, you can rename a
                                                                                             layer group just as easily
                                                                                             as you can rename a
                11.  In the New Group from Layers dialog box, type Logos in the Name field   layer.
                    and click OK.
                    As with any other layer, you should name groups based on what they contain so you can
                    easily identify them later.
                                                                                             Note:

                                                                                             You can create up to
                                                                                             ten levels of nested layer
                                                                                             groups, or groups inside
                                                                                             of other groups.


                12.  Click the arrow to the left of the Logos group name to expand the layer group.
                    You have to expand the layer group to be able to access and edit individual layers in the
                    group. If you select the entire layer group, you can move all layers within the group at
                    the same time. Layers in the group maintain their position relative to one another.
                                                                                             Note:
                                                                                             You can click the eye icon
                                                                                             for a layer folder to hide
                                                                                             the entire layer group
                                                                                             (and all layers inside the
                                                                                             folder).


                13.  Save the file and continue to the next exercise.


           52 Project 1: Composite Movie Ad

