


Page 39 - CS6_PS_Look_Inside
P. 39
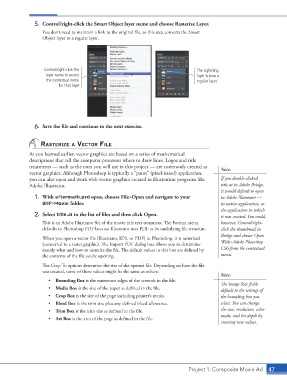
5.  Control/right-click the Smart Object layer name and choose Rasterize Layer.
                        You don’t need to maintain a link to the original file, so this step converts the Smart
                        Object layer to a regular layer.


                         Control/right-click the                                       The Lightning
                         layer name to access                                          layer is now a
                         the contextual menu                                           regular layer.
                               for that layer.


                    6.  Save the file and continue to the next exercise.


                       rAsterize A vector file
                  As you learned earlier, vector graphics are based on a series of mathematical
                  descriptions that tell the computer processor where to draw lines. Logos and title
                  treatments — such as the ones you will use in this project — are commonly created as   Note:
                  vector graphics. Although Photoshop is typically a “paint” (pixel-based) application,
                  you can also open and work with vector graphics created in illustration programs like   If you double-clicked
                  Adobe Illustrator.                                                             title.ai in Adobe Bridge,
                                                                                                 it would default to open
                    1.  With aftermath.psd open, choose File>Open and navigate to your           in Adobe Illustrator —
                        WIP>Movie folder.                                                        its native application, or
                                                                                                 the application in which
                    2.  Select title.ai in the list of files and then click Open.                it was created. You could,

                        This is an Adobe Illustrator file of the movie title text treatment. The Format menu   however, Control/right-
                        defaults to Photoshop PDF because Illustrator uses PDF as its underlying file structure.  click the thumbnail in
                                                                                                 Bridge and choose Open
                        When you open a vector file (Illustrator, EPS, or PDF) in Photoshop, it is rasterized
                        (converted to a raster graphic). The Import PDF dialog box allows you to determine   With>Adobe Photoshop
                        exactly what and how to rasterize the file. The default values in this box are defined by   CS6 from the contextual
                        the contents of the file you’re opening.                                 menu.
                        The Crop To options determine the size of the opened file. Depending on how the file
                        was created, some of these values might be the same as others:
                                                                                                 Note:
                          •  Bounding Box is the outermost edges of the artwork in the file.
                                                                                                 The Image Size fields
                          •  Media Box is the size of the paper as defined in the file.          default to the settings of
                          •  Crop Box is the size of the page including printer’s marks.         the bounding box you
                          •  Bleed Box is the trim size plus any defined bleed allowance.        select. You can change
                          •  Trim Box is the trim size as defined in the file.                   the size, resolution, color
                                                                                                 mode, and bit depth by
                          •  Art Box is the area of the page as defined in the file.
                                                                                                 entering new values.


                                                                                    Project 1: Composite Movie Ad   47

