


Page 40 - CS6_PS_Look_Inside
P. 40
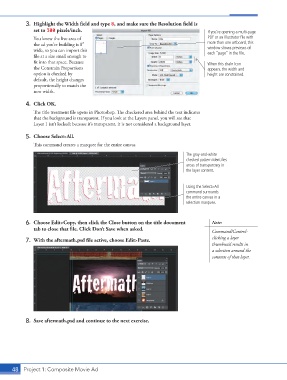
3.  Highlight the Width field and type 8, and make sure the Resolution field is
                    set to 300 pixels/inch.                                                If you’re opening a multi-page
                    You know the live area of                                              PDF or an Illustrator file with
                    the ad you’re building is 8″                                           more than one artboard, this
                    wide, so you can import this                                           window shows previews of
                                                                                           each “page” in the file.
                    file at a size small enough to
                    fit into that space. Because                                           When this chain icon
                    the Constrain Proportions                                              appears, the width and
                    option is checked by                                                   height are constrained.
                    default, the height changes
                    proportionally to match the
                    new width.

                 4.  Click OK.
                    The title treatment file opens in Photoshop. The checkered area behind the text indicates
                    that the background is transparent. If you look at the Layers panel, you will see that
                    Layer 1 isn’t locked; because it’s transparent, it is not considered a background layer.

                 5.  Choose Select>All.

                    This command creates a marquee for the entire canvas.
                                                                                   The gray-and-white
                                                                                   checked pattern identifies
                                                                                   areas of transparency in
                                                                                   the layer content.


                                                                                   Using the Select>All
                                                                                   command surrounds
                                                                                   the entire canvas in a
                                                                                   selection marquee.


                 6.  Choose Edit>Copy, then click the Close button on the title document     Note:
                    tab to close that file. Click Don’t Save when asked.
                                                                                             Command/Control-
                 7.  With the aftermath.psd file active, choose Edit>Paste.                  clicking a layer
                                                                                             thumbnail results in
                                                                                             a selection around the
                                                                                             contents of that layer.


                 8.  Save aftermath.psd and continue to the next exercise.


           48 Project 1: Composite Movie Ad

