


Page 38 - CS6_PS_Look_Inside
P. 38
plAce A file froM Mini bridge
               In addition to opening new files, you can also use the Mini Bridge panel to place
               content directly into an open file. This removes a few steps from the process of
               compositing multiple images.

                 1.  With aftermath.psd open, choose View>Fit on Screen.
                 2.  In the Mini Bridge panel, navigate to the WIP>Movie folder if necessary.

                 3.  Click the Lightning.jpg thumbnail in the panel and drag it to the
                    aftermath.psd document window.
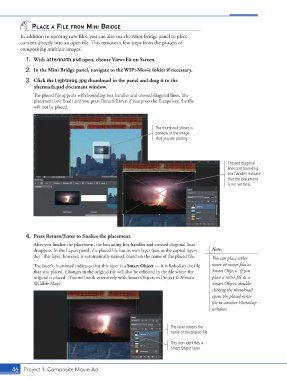
                    The placed file appears with bounding box handles and crossed diagonal lines. The
                    placement isn’t final until you press Return/Enter; if you press the Escape key, the file
                    will not be placed.


                                                                      The thumbnail shows a
                                                                      preview of the image
                                                                      that you are placing.


                                                                                                    Crossed diagonal
                                                                                                    lines and bounding
                                                                                                    box handles indicate
                                                                                                    that the placement
                                                                                                    is not yet final.


                 4.  Press Return/Enter to finalize the placement.
                    After you finalize the placement, the bounding box handles and crossed diagonal lines
                    disappear. In the Layers panel, the placed file has its own layer (just as the copied layers   Note:
                    do). This layer, however, is automatically named, based on the name of the placed file.   You can place either
                    The layer’s thumbnail indicates that this layer is a Smart Object — it is linked to the file   raster or vector files as
                    that you placed. Changes in the original file will also be reflected in the file where the   Smart Objects. If you
                    original is placed. (You will work extensively with Smart Objects in Project 2: African   place a raster file as a
                    Wildlife Map)                                                            Smart Object, double-
                                                                                             clicking the thumbnail
                                                                                             opens the placed raster
                                                                                             file in another Photoshop
                                                                                             window.


                                                                            The layer adopts the
                                                                            name of the placed file.
                                                                            This icon identifies a
                                                                            Smart Object layer.


           46 Project 1: Composite Movie Ad

