


Page 61 - CC2019_PS_Look_Inside
P. 61
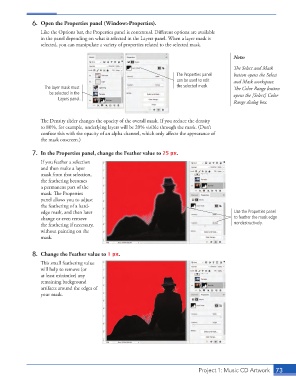
6.  Open the Properties panel (Window>Properties).
                      Like the Options bar, the Properties panel is contextual. Different options are available
                      in the panel depending on what is selected in the Layers panel. When a layer mask is
                      selected, you can manipulate a variety of properties related to the selected mask.

                                                                                                Note:

                                                                                                The Select and Mask
                                                                          The Properties panel   button opens the Select
                                                                          can be used to edit   and Mask workspace.
                       The layer mask must                                the selected mask.    The Color Range button
                         be selected in the                                                     opens the [Select] Color
                             Layers panel.
                                                                                                Range dialog box.


                      The Density slider changes the opacity of the overall mask. If you reduce the density
                      to 80%, for example, underlying layers will be 20% visible through the mask. (Don’t
                      confuse this with the opacity of an alpha channel, which only affects the appearance of
                      the mask onscreen.)

                   7.  In the Properties panel, change the Feather value to 25 px.
                      If you feather a selection
                      and then make a layer
                      mask from that selection,
                      the feathering becomes
                      a permanent part of the
                      mask. The Properties
                      panel allows you to adjust
                      the feathering of a hard-
                      edge mask, and then later                                                 Use the Properties panel
                      change or even remove                                                     to feather the mask edge
                      the feathering if necessary,                                              nondestructively.
                      without painting on the
                      mask.


                   8.  Change the Feather value to 1 px.
                      This small feathering value
                      will help to remove (or
                      at least minimize) any
                      remaining background
                      artifacts around the edges of
                      your mask.


                                                                                  Project 1: Music CD Artwork   73

