


Page 31 - CC2019_PS_Look_Inside
P. 31
9.  Choose Edit> Copy.                                                        Note:
                      Th  e standard Cut, Copy, and Paste options are available in Photoshop, just as they are   If you want to move
                      in most applications. Whatever you have selected will be copied to the Clipboard, and
                      whatever is in the Clipboard will be pasted.                              a marquee, make sure
                                                                                                the Marquee tool is still
                  10.  Click the Close button on the Tornado.jpg document tab to close that fi le.  selected. If the  Move tool
                                                                                                is active, clicking inside
                  11.  With the cd-artwork.psd fi le active, choose Edit> Paste.                the marquee and drag-
                      Th  e copied selection is pasted in the center of the document window. If you remember   ging will actually move
                      from the Image Size dialog box, the tornado image was approximately 30″ 1 20″ at   the contents within the
                      150 ppi. Photoshop cannot maintain multiple resolutions in a single fi le. When you   selection area.
                      paste the copied content into the cd-artwork fi le, it adopts the resolution of the target
                      fi le (in this case, 300 ppi). Th  e concept of  eff ective resolution transforms the selected
                      area (20.5″ 1 18″) of the tornado image to approximately 10.25″ 1 9″ at 300 ppi.  Note:
                                                                                                When creating a new se-
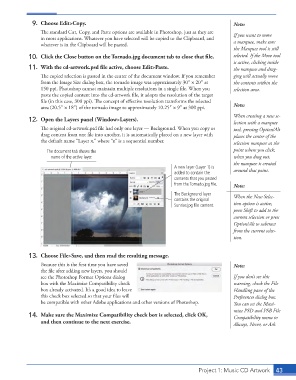
                  12.  Open the  Layers panel (Window>Layers).
                                                                                                lection with a marquee
                      Th  e original cd-artwork.psd fi le had only one layer —  Background. When you copy or   tool, pressing Option/Alt
                      drag content from one fi le into another, it is automatically placed on a new layer with   places the center of the
                      the default name “Layer n,” where “n” is a sequential number.             selection marquee at the

                        The document tab shows the                                              point where you click;
                          name of the active layer.                                             when you drag out,
                                                                                                the marquee is created
                                                                         A new layer (Layer 1) is
                                                                         added to contain the   around that point.
                                                                         contents that you pasted
                                                                         from the Tornado.jpg file.  Note:
                                                                         The Background layer   When the New Selec-
                                                                         contains the original
                                                                         Sunrise.jpg file content.  tion option is active,
                                                                                                press Shift to add to the
                                                                                                current selection or press
                                                                                                Option/Alt to subtract
                                                                                                from the current selec-
                                                                                                tion.


                  13.  Choose File>Save, and then read the resulting message.
                      Because this is the fi rst time you have saved                            Note:
                      the fi le after adding new layers, you should
                      see the  Photoshop Format Options dialog                                  If you don’t see this
                      box with the  Maximize Compatibility check                                warning, check the  File
                      box already activated. It’s a good idea to leave                          Handling pane of the
                      this check box selected so that your fi les will                          Preferences dialog box.
                      be compatible with other Adobe applications and other versions of Photoshop.  You can set the Maxi-
                                                                                                mize PSD and PSB File
                  14.  Make sure the Maximize Compatibility check box is selected, click OK,    Compatibility menu to
                      and then continue to the next exercise.
                                                                                                Always, Never, or Ask.


                                                                                    Project 1: Music CD Artwork  43

