


Page 26 - CC2019_PS_Look_Inside
P. 26
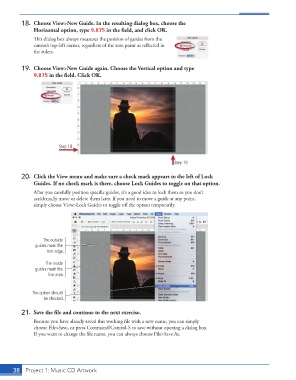
18.  Choose View> New Guide. In the resulting dialog box, choose the
                   Horizontal option, type 9.875 in the fi eld, and click OK.
                   Th  is dialog box always measures the position of guides from the
                   canvas’s top-left corner, regardless of the zero point as refl ected in
                   the rulers.


               19.  Choose View>New Guide again. Choose the Vertical option and type
                   9.875 in the fi eld. Click OK.


                             Step 18


                                                                         Step 19

               20.  Click the  View menu and make sure a check mark appears to the left of Lock
                   Guides. If no check mark is there, choose  Lock Guides to toggle on that option.
                   After you carefully position specifi c guides, it’s a good idea to lock them so you don’t
                   accidentally move or delete them later. If you need to move a guide at any point,
                   simply choose View>Lock Guides to toggle off  the option temporarily.


                       The outside
                    guides mark the
                        trim edge.

                        The inside
                    guides mark the
                         live area.


                   The option should
                       be checked.

               21.  Save the fi le and continue to the next exercise.
                   Because you have already saved this working fi le with a new name, you can simply
                   choose File>Save, or press Command/Control-S to save without opening a dialog box.
                   If you want to change the fi le name, you can always choose File>Save As.


           38     Project 1: Music CD Artwork

