


Page 27 - CC2019_PS_Look_Inside
P. 27
The Crop Tools in Depth
When the Crop tool is selected, the Options bar can be used to define a number of settings related to the cropped area.
The first menu includes a number of When you finalize the crop, the resulting image will be resized
common aspect ratio presets. If you to 9 9, regardless of the actual size of the crop marquee.
choose one of these, the crop marquee This presents a problem if you remember the principles of
is constrained to the specified aspect resolution.
ratio. It’s important to note that these
presets define only the aspect ratio of Enlarging a 3 3 area (for example) to 9 9 means the
the crop, not the actual size. application needs to create enough pixels to fill in the 6 extra
inches. At 300 ppi, Photoshop needs to create (“interpolate”)
You can also choose the W x H x Resolution option to more than 1800 pixels per linear inch. Although Photoshop
define custom settings for the result of a crop. For example, if can enlarge images with reasonable success, such a
you define the width and height of a crop area as 9 9 at significant amount of new data will not result in the best
300 ppi, when you click and drag to draw, the crop area will possible quality. As a general rule, you should avoid enlarging
be restricted to the same proportions defined in the Width raster images by such a large percentage.
and Height fields (in this example, 1:1).
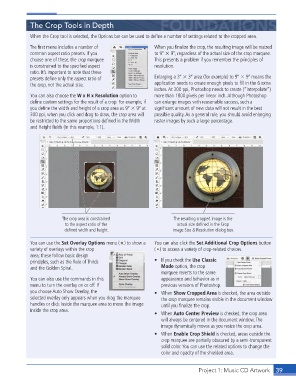
The crop area is constrained The resulting cropped image is the
to the aspect ratio of the actual size defined in the Crop
defined width and height. Image Size & Resolution dialog box.
You can use the Set Overlay Options menu ( ) to show a You can also click the Set Additional Crop Options button
variety of overlays within the crop ( ) to access a variety of crop-related choices.
area; these follow basic design
principles, such as the Rule of Thirds • If you check the Use Classic
and the Golden Spiral. Mode option, the crop
marquee reverts to the same
You can also use the commands in this appearance and behavior as in
menu to turn the overlay on or off. If previous versions of Photoshop.
you choose Auto Show Overlay, the • When Show Cropped Area is checked, the area outside
selected overlay only appears when you drag the marquee the crop marquee remains visible in the document window
handles or click inside the marquee area to move the image until you finalize the crop.
inside the crop area.
• When Auto Center Preview is checked, the crop area
will always be centered in the document window. The
image dynamically moves as you resize the crop area.
• When Enable Crop Shield is checked, areas outside the
crop marquee are partially obscured by a semi-transparent
solid color. You can use the related options to change the
color and opacity of the shielded area.
Project 1: Music CD Artwork 39

