


Page 59 - CC2018_PS_Look_Inside
P. 59
13.  Experiment with the various adjustments until you’re satisfied with the
                   selection edge.

                   We increased the Smooth value to 10 to reduce jagged effects at the selection edge.

               14.  Expand the Output Settings in the Properties panel and choose the Layer
                   Mask option in the Output To menu.                                       Note:
                   This menu can be used to create a new layer or file (with or             Decontaminate Colors
                   without a mask) from the selection. You want to mask the                 can be checked to remove
                   existing layer, so you are using the Layer Mask option.                  a certain percentage of

                                                                                            color from the edge of a
               15.  Click OK to accept your refined selection.                              selection.
                   When you pasted the feathered selection from the original Lightning.jpg file, you pasted
                   only the pixels inside the selection area; unselected pixels from the original image are not
                   a part of the composite file.
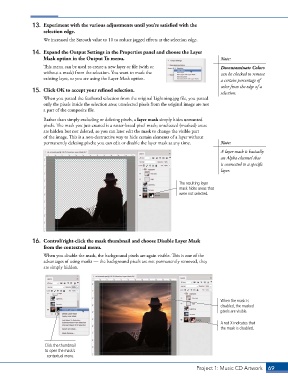
                   Rather than simply excluding or deleting pixels, a layer mask simply hides unwanted
                   pixels. The mask you just created is a raster-based pixel mask; unselected (masked) areas
                   are hidden but not deleted, so you can later edit the mask to change the visible part
                   of the image. This is a non-destructive way to hide certain elements of a layer without
                   permanently deleting pixels; you can edit or disable the layer mask at any time.  Note:
                                                                                            A layer mask is basically
                                                                                            an Alpha channel that
                                                                                            is connected to a specific
                                                                                            layer.

                                                                           The resulting layer
                                                                           mask hides areas that
                                                                           were not selected.


               16.  Control/right-click the mask thumbnail and choose Disable Layer Mask
                   from the contextual menu.
                   When you disable the mask, the background pixels are again visible. This is one of the
                   advantages of using masks — the background pixels are not permanently removed, they
                   are simply hidden.


                                                                                            When the mask is
                                                                                            disabled, the masked
                                                                                            pixels are visible.
                                                                                            A red X indicates that
                                                                                            the mask is disabled.


                   Click the thumbnail
                    to open the mask’s
                    contextual menu.

                                                                                  Project 1: Music CD Artwork   69

