


Page 61 - CS6_ID_Look_Inside
P. 61
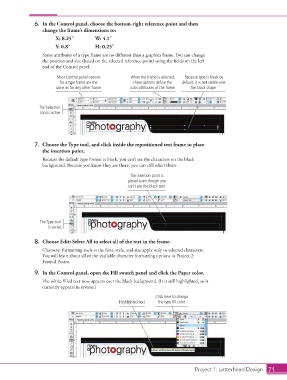
6.  In the Control panel, choose the bottom-right reference point and then
                        change the frame’s dimensions to:
                             X: 8.25″        W: 4.1″
                             Y: 0.8″         H: 0.25″

                        Some attributes of a type frame are no different than a graphics frame. You can change
                        the position and size (based on the selected reference point) using the fields on the left
                        end of the Control panel.
                              Most Control panel options    When the frame is selected,   Because type is black by
                               for a type frame are the      these options define the   default, it is not visible over
                             same as for any other frame.   color attributes of the frame.  the black shape.


                      The Selection
                       tool is active.


                    7.  Choose the Type tool, and click inside the repositioned text frame to place
                        the insertion point.
                        Because the default type format is black, you can’t see the characters on the black
                        background. Because you know they are there, you can still select them.

                                                            The insertion point is
                                                           placed even though you
                                                           can’t see the black text.


                       The Type tool
                          is active.

                    8.  Choose Edit>Select All to select all of the text in the frame.
                        Character formatting such as the font, style, and size apply only to selected characters.
                        You will learn about all of the available character formatting options in Project 2:
                        Festival Poster.
                    9.  In the Control panel, open the Fill swatch panel and click the Paper color.
                        The white-filled text now appears over the black background. (It is still highlighted, so it
                        currently appears in reverse.)
                                                                      Click here to change
                                                       Highlighted text  the type fill color.


                                                                                      Project 1: Letterhead Design  71

