


Page 35 - CS6_ID_Look_Inside
P. 35
15.  Open the Align panel (Window>Object & Layout>Align).

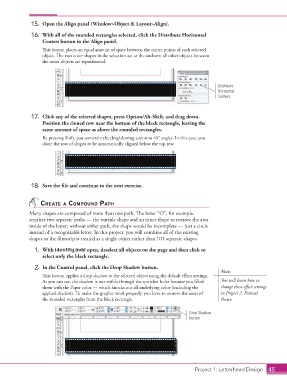
                   16.  With all of the rounded rectangles selected, click the Distribute Horizontal
                        Centers button in the Align panel.
                        This button places an equal amount of space between the center points of each selected
                        object. The two outer shapes in the selection act as the anchors; all other objects between
                        the outer objects are repositioned.


                                                                                                Distribute
                                                                                                Horizontal
                                                                                                Centers


                   17.  Click any of the selected shapes, press Option/Alt-Shift, and drag down.
                        Position the cloned row near the bottom of the black rectangle, leaving the
                        same amount of space as above the rounded rectangles.
                        By pressing Shift, you constrain the drag/cloning action to 45° angles. In this case, you
                        clone the row of shapes to be automatically aligned below the top row.


                   18.  Save the file and continue to the next exercise.


                       create a comPound Path
                  Many shapes are composed of more than one path. The letter “O”, for example,
                  requires two separate paths — the outside shape and an inner shape to remove the area
                  inside of the letter; without either path, the shape would be incomplete — just a circle
                  instead of a recognizable letter. In this project, you will combine all of the existing
                  shapes so the filmstrip is treated as a single object rather than 101 separate shapes.
                    1.  With identity.indd open, deselect all objects on the page and then click to
                        select only the black rectangle.

                    2.  In the Control panel, click the Drop Shadow button.
                                                                                                 Note:
                        This button applies a drop shadow to the selected object using the default effect settings.
                        As you can see, the shadow is not visible through the sprocket holes because you filled   You will learn how to
                        them with the Paper color — which knocks out all underlying color (including the   change these effect settings
                        applied shadow). To make the graphic work properly, you have to remove the areas of   in Project 2: Festival
                        the rounded rectangles from the black rectangle.                         Poster.


                                                                                    Drop Shadow
                                                                                    button


                                                                                      Project 1: Letterhead Design  45

