


Page 32 - CS6_ID_Look_Inside
P. 32
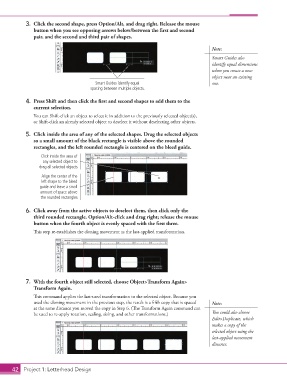
3.  Click the second shape, press Option/Alt, and drag right. Release the mouse
                    button when you see opposing arrows below/between the first and second
                    pair, and the second and third pair of shapes.

                                                                                             Note:
                                                                                             Smart Guides also
                                                                                             identify equal dimensions
                                                                                             when you create a new
                                                                                             object near an existing
                                              Smart Guides identify equal                    one.
                                            spacing between multiple objects.

                 4.  Press Shift and then click the first and second shapes to add them to the
                    current selection.
                    You can Shift-click an object to select it in addition to the previously selected object(s),
                    or Shift-click an already selected object to deselect it without deselecting other objects.

                 5.  Click inside the area of any of the selected shapes. Drag the selected objects
                    so a small amount of the black rectangle is visible above the rounded
                    rectangles, and the left rounded rectangle is centered on the bleed guide.

                       Click inside the area of
                        any selected object to
                       drag all selected objects.

                       Align the center of the
                       left shape to the bleed
                       guide and leave a small
                       amount of space above
                       the rounded rectangles.

                 6.  Click away from the active objects to deselect them, then click only the
                    third rounded rectangle. Option/Alt-click and drag right; release the mouse
                    button when the fourth object is evenly spaced with the first three.
                    This step re-establishes the cloning movement as the last-applied transformation.


                 7.  With the fourth object still selected, choose Object>Transform Again>
                    Transform Again.
                    This command applies the last-used transformation to the selected object. Because you
                    used the cloning movement in the previous step, the result is a fifth copy that is spaced   Note:
                    at the same distance you moved the copy in Step 6. (The Transform Again command can
                    be used to re-apply rotation, scaling, sizing, and other transformations.)  You could also choose
                                                                                             Edit>Duplicate, which
                                                                                             makes a copy of the
                                                                                             selected object using the
                                                                                             last-applied movement
                                                                                             distance.


           42 Project 1: Letterhead Design

