
Page 40 - CC 2019 ID Look Inside
P. 40
10. Click the right-center handle again. Without pressing the Spacebar, drag Note:
left until the cursor feedback shows the width of the selection is 5.5″.
Dragging a center handle
Simply dragging the handle resizes the entire selection; the spacing and position of changes the object size in
various selected objects relative to one another is not aff ected.
only one direction.
11. With the fi ve frames selected, choose Object>Group.
Grouping multiple objects means you can treat them as a single unit.
After grouping,
a single bounding box
outlines the entire group.
Note:
12. Open the Align panel (Window>Object & Layout>Align).
Group objects by pressing
You can use the Align panel to align multiple objects relative to one another, to the Command/Control-G.
page, or to the spread. Th e Align Objects options are fairly self-explanatory; when
multiple objects are selected, they align based on the edge(s) or center(s) you click. Ungroup objects by press-
ing Command/Control-
Align Right Edges Align Top Edges
Align Horizontal Centers Align Vertical Centers Shift-G.
Align Left Edges Align Bottom Edges
Distribute Top Edges Distribute Right Edges Note:
Distribute Vertical Centers Distribute Horizontal Centers
Distribute Bottom Edges Distribute Left Edges When the insertion point
is not fl ashing in text,
choosing Edit> Select All
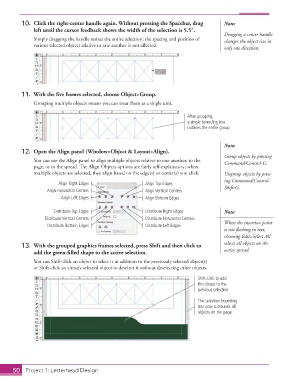
13. With the grouped graphics frames selected, press Shift and then click to selects all objects on the
add the green-fi lled shape to the active selection. active spread.
You can Shift-click an object to select it in addition to the previously selected object(s)
or Shift-click an already selected object to deselect it without deselecting other objects.
Shift-click to add
this shape to the
previous selection.
The selection bounding
box now surrounds all
objects on the page.
50 Project 1: Letterhead Design