
Page 39 - CC 2019 ID Look Inside
P. 39
5. With the third object still selected, choose Object>Transform Again> Transform Again.
Th is command applies the last-used transformation to the selected
object. Because you used the cloning movement in the previous
step, the result is a fourth copy spaced at the same distance used
in Step 4. (Th e Transform Again command can be used to reapply
rotation, scaling, sizing, and other transformations.)
Note:
You can choose
Object> Step and Repeat
to make more than one
6. With the fourth frame selected, choose Edit> Duplicate. copy of an object using
Th is command makes a copy of the selected object using the last-applied distance. specifi c horizontal and
vertical distances for
each copy.
Note:
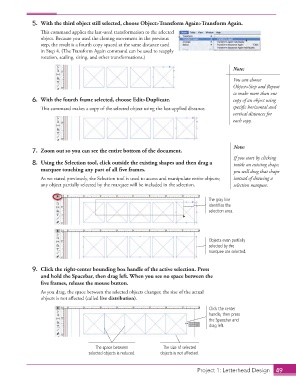
7. Zoom out so you can see the entire bottom of the document.
If you start by clicking
8. Using the Selection tool, click outside the existing shapes and then drag a inside an existing shape,
marquee touching any part of all fi ve frames. you will drag that shape
As we stated previously, the Selection tool is used to access and manipulate entire objects; instead of drawing a
any object partially selected by the marquee will be included in the selection. selection marquee.
The gray line
identifies the
selection area.
Objects even partially
selected by the
marquee are selected.
9. Click the right-center bounding box handle of the active selection. Press
and hold the Spacebar, then drag left. When you see no space between the
fi ve frames, release the mouse button.
As you drag, the space between the selected objects changes; the size of the actual
objects is not aff ected (called live distribution).
Click the center
handle, then press
the Spacebar and
drag left.
The space between The size of selected
selected objects is reduced. objects is not affected.
Project 1: Letterhead Design 49