


Page 33 - CC2018_ID_Look_Inside
P. 33
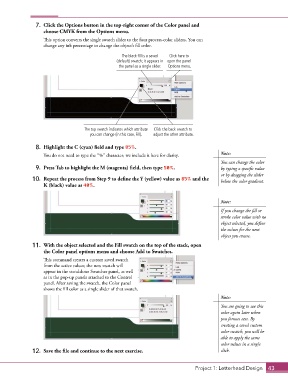
7.  Click the Options button in the top-right corner of the Color panel and
                   choose CMYK from the Options menu.

                   This option converts the single swatch slider to the four process-color sliders. You can
                   change any ink percentage to change the object’s fill color.

                                                   The black fill is a saved   Click here to
                                                 (default) swatch; it appears in  open the panel
                                                  the panel as a single slider.  Options menu.


                                    The top swatch indicates which attribute   Click the back swatch to
                                      you can change (in this case, Fill).  adjust the other attribute.

                8.  Highlight the C (cyan) field and type 85%.
                   You do not need to type the “%” character; we include it here for clarity.  Note:
                                                                                            You can change the color
                9.  Press Tab to highlight the M (magenta) field, then type 50%.            by typing a specific value
                                                                                            or by dragging the slider
               10.  Repeat the process from Step 9 to define the Y (yellow) value as 85% and the   below the color gradient.
                   K (black) value as 40%.


                                                                                            Note:

                                                                                            If you change the fill or
                                                                                            stroke color value with no
                                                                                            object selected, you define
                                                                                            the values for the next
                                                                                            object you create.
               11.  With the object selected and the Fill swatch on the top of the stack, open
                   the Color panel options menu and choose Add to Swatches.
                   This command creates a custom saved swatch
                   from the active values; the new swatch will
                   appear in the standalone Swatches panel, as well
                   as in the pop-up panels attached to the Control
                   panel. After saving the swatch, the Color panel
                   shows the fill color as a single slider of that swatch.
                                                                                            Note:
                                                                                            You are going to use this
                                                                                            color again later when
                                                                                            you format text. By
                                                                                            creating a saved custom
                                                                                            color swatch, you will be
                                                                                            able to apply the same
                                                                                            color values in a single
               12.  Save the file and continue to the next exercise.                        click.


                                                                                  Project 1: Letterhead Design  43

