


Page 32 - CC2018_ID_Look_Inside
P. 32
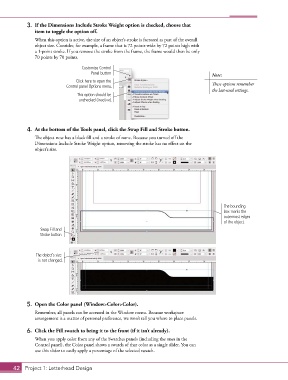
3.  If the Dimensions Include Stroke Weight option is checked, choose that
               item to toggle the option off.

               When this option is active, the size of an object’s stroke is factored as part of the overall
               object size. Consider, for example, a frame that is 72 points wide by 72 points high with
               a 1-point stroke. If you remove the stroke from the frame, the frame would then be only
               70 points by 70 points.

                                   Customize Control
                                       Panel button                                     Note:
                                Click here to open the
                            Control panel Options menu.                                 These options remember
                                                                                        the last-used settings.
                                 This option should be
                                  unchecked (inactive).


            4.  At the bottom of the Tools panel, click the Swap Fill and Stroke button.

               The object now has a black fill and a stroke of none. Because you turned off the
               Dimensions Include Stroke Weight option, removing the stroke has no effect on the
               object’s size.


                                                                                             The bounding
                                                                                             box marks the
                                                                                             outermost edges
                                                                                             of the object.
                  Swap Fill and
                  Stroke button


                The object’s size
                 is not changed.


            5.  Open the Color panel (Window>Color>Color).
               Remember, all panels can be accessed in the Window menu. Because workspace
               arrangement is a matter of personal preference, we won’t tell you where to place panels.

            6.  Click the Fill swatch to bring it to the front (if it isn’t already).
               When you apply color from any of the Swatches panels (including the ones in the
               Control panel), the Color panel shows a swatch of that color as a single slider. You can
               use this slider to easily apply a percentage of the selected swatch.


       42 Project 1: Letterhead Design

