


Page 18 - CC2018_ID_Look_Inside
P. 18
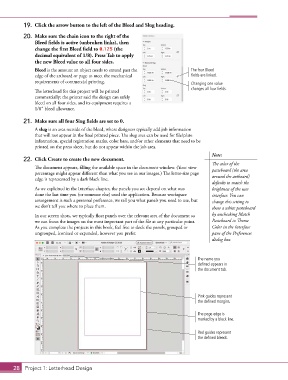
19.  Click the arrow button to the left of the Bleed and Slug heading.
           20.  Make sure the chain icon to the right of the
               Bleed fields is active (unbroken links), then
               change the first Bleed field to 0.125 (the
               decimal equivalent of 1/8). Press Tab to apply
               the new Bleed value to all four sides.
               Bleed is the amount an object needs to extend past the           The four Bleed
               edge of the artboard or page to meet the mechanical              fields are linked.
               requirements of commercial printing.                             Changing one value
                                                                                changes all four fields.
               The letterhead for this project will be printed
               commercially; the printer said the design can safely
               bleed on all four sides, and its equipment requires a
               1/8″ bleed allowance.

           21.  Make sure all four Slug fields are set to 0.
               A slug is an area outside of the bleed, where designers typically add job information
               that will not appear in the final printed piece. The slug area can be used for file/plate
               information, special registration marks, color bars, and/or other elements that need to be
               printed on the press sheet, but do not appear within the job area.
                                                                                        Note:
           22.  Click Create to create the new document.
                                                                                        The color of the
               The document appears, filling the available space in the document window. (Your view   pasteboard (the area
               percentage might appear different than what you see in our images.) The letter-size page   around the artboard)
               edge is represented by a dark black line.
                                                                                        defaults to match the
               As we explained in the Interface chapter, the panels you see depend on what was   brightness of the user
               done the last time you (or someone else) used the application. Because workspace   interface. You can
               arrangement is such a personal preference, we tell you what panels you need to use, but   change this setting to
               we don’t tell you where to place them.                                   show a white pasteboard

               In our screen shots, we typically float panels over the relevant area of the document so   by unchecking Match
               we can focus the images on the most important part of the file at any particular point.   Pasteboard to Theme
               As you complete the projects in this book, feel free to dock the panels, grouped or   Color in the Interface
               ungrouped, iconized or expanded, however you prefer.                     pane of the Preferences
                                                                                        dialog box.


                                                                                   The name you
                                                                                   defined appears in
                                                                                   the document tab.


                                                                                   Pink guides represent
                                                                                   the defined margins.

                                                                                   The page edge is
                                                                                   marked by a black line.

                                                                                   Red guides represent
                                                                                   the defined bleeds.


       28 Project 1: Letterhead Design

