


Page 35 - CC2018_WD_Look_Inside
P. 35
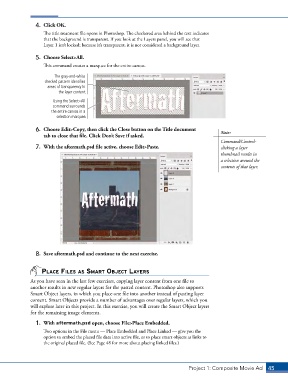
4.  Click OK.
                   The title treatment file opens in Photoshop. The checkered area behind the text indicates
                   that the background is transparent. If you look at the Layers panel, you will see that
                   Layer 1 isn’t locked; because it’s transparent, it is not considered a background layer.

                5.  Choose Select>All.
                   This command creates a marquee for the entire canvas.

                        The gray-and-white
                   checked pattern identifies
                     areas of transparency in
                         the layer content.
                       Using the Select>All
                       command surrounds
                      the entire canvas in a
                        selection marquee.

                6.  Choose Edit>Copy, then click the Close button on the Title document     Note:
                   tab to close that file. Click Don’t Save if asked.
                                                                                            Command/Control-
                7.  With the aftermath.psd file active, choose Edit>Paste.                  clicking a layer
                                                                                            thumbnail results in
                                                                                            a selection around the
                                                                                            contents of that layer.


                8.  Save aftermath.psd and continue to the next exercise.


                  plACe files As smArt objeCt lAyers

              As you have seen in the last few exercises, copying layer content from one file to
              another results in new regular layers for the pasted content. Photoshop also supports
              Smart Object layers, in which you place one file into another instead of pasting layer
              content. Smart Objects provide a number of advantages over regular layers, which you
              will explore later in this project. In this exercise, you will create the Smart Object layers
              for the remaining image elements.
                1.  With aftermath.psd open, choose File>Place Embedded.
                   Two options in the File menu — Place Embedded and Place Linked — give you the
                   option to embed the placed file data into active file, or to place smart objects as links to
                   the original placed file. (See Page 48 for more about placing linked files.)


                                                                               Project 1: Composite Movie Ad    45

