


Page 57 - CC2017_WD_Look_Inside
P. 57
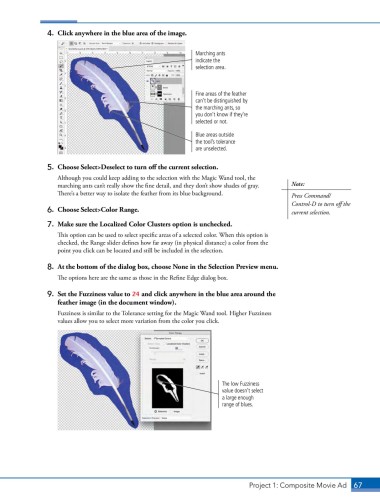
4.  Click anywhere in the blue area of the image.


                                                              Marching ants
                                                              indicate the
                                                              selection area.


                                                              Fine areas of the feather
                                                              can’t be distinguished by
                                                              the marching ants, so
                                                              you don’t know if they’re
                                                              selected or not.

                                                              Blue areas outside
                                                              the tool’s tolerance
                                                              are unselected.


                5.  Choose Select>Deselect to turn off the current selection.
                   Although you could keep adding to the selection with the Magic Wand tool, the
                   marching ants can’t really show the fine detail, and they don’t show shades of gray.   Note:
                   There’s a better way to isolate the feather from its blue background.    Press Command/
                                                                                            Control-D to turn off the
                6.  Choose Select>Color Range.                                              current selection.

                7.  Make sure the Localized Color Clusters option is unchecked.
                   This option can be used to select specific areas of a selected color. When this option is
                   checked, the Range slider defines how far away (in physical distance) a color from the
                   point you click can be located and still be included in the selection.

                8.  At the bottom of the dialog box, choose None in the Selection Preview menu.

                   The options here are the same as those in the Refine Edge dialog box.

                9.  Set the Fuzziness value to 24 and click anywhere in the blue area around the
                   feather image (in the document window).
                   Fuzziness is similar to the Tolerance setting for the Magic Wand tool. Higher Fuzziness
                   values allow you to select more variation from the color you click.


                                                                      The low Fuzziness
                                                                      value doesn’t select
                                                                      a large enough
                                                                      range of blues.


                                                                               Project 1: Composite Movie Ad    67

