


Page 48 - CC2017_WD_Look_Inside
P. 48
drAW A veCtor pAth
          In some cases, the image content makes it difficult (or at least tedious) to select by
          color. The bottle image in this ad, for example, has only black colors — the bottle
          is black, the shadow is a medium black, and the background is a mottled light gray.
          Selecting by color range will almost certainly result in some of the selection intruding
          into the bottle shape, and some of the background/shadow area being omitted from
          the selection. The good news is that Photoshop has other ways for making selections,
          including several that are specifically designed for selecting areas with hard edges.


           Understanding Anchor Points and Handles

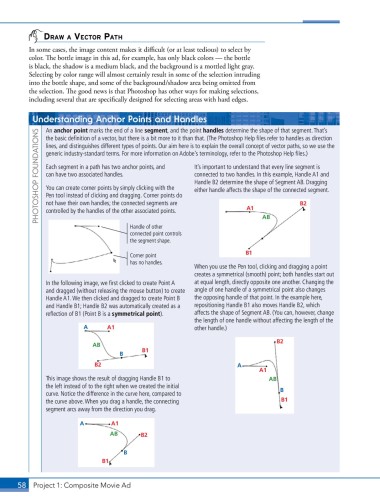
               An anchor point marks the end of a line segment, and the point handles determine the shape of that segment. That’s
             PHOTOSHOP FOUNDATIONS  generic industry-standard terms. For more information on Adobe’s terminology, refer to the Photoshop Help files.)
               the basic definition of a vector, but there is a bit more to it than that. (The Photoshop Help files refer to handles as direction
               lines, and distinguishes different types of points. Our aim here is to explain the overall concept of vector paths, so we use the


                                                              It’s important to understand that every line segment is
               Each segment in a path has two anchor points, and
                                                              connected to two handles. In this example, Handle A1 and
               can have two associated handles.
                                                              Handle B2 determine the shape of Segment AB. Dragging
               You can create corner points by simply clicking with the
                                                              either handle affects the shape of the connected segment.
               Pen tool instead of clicking and dragging. Corner points do
               not have their own handles; the connected segments are
               controlled by the handles of the other associated points.

                                          Handle of other                     A1   AB          B2
                                          connected point controls
                                          the segment shape.

                                          Corner point                        B1
                                          has no handles.
                                                              When you use the Pen tool, clicking and dragging a point
                                                              creates a symmetrical (smooth) point; both handles start out
               In the following image, we first clicked to create Point A   at equal length, directly opposite one another. Changing the
               and dragged (without releasing the mouse button) to create   angle of one handle of a symmetrical point also changes
               Handle A1. We then clicked and dragged to create Point B   the opposing handle of that point. In the example here,
               and Handle B1; Handle B2 was automatically created as a   repositioning Handle B1 also moves Handle B2, which
               reflection of B1 (Point B is a symmetrical point).  affects the shape of Segment AB. (You can, however, change
                                                              the length of one handle without affecting the length of the
                           A       A1                         other handle.)

                                                                                       B2
                              AB
                                      B      B1
                               B2                                          A
                                                                                  A1
               This image shows the result of dragging Handle B1 to                  AB
               the left instead of to the right when we created the initial              B
               curve. Notice the difference in the curve here, compared to
               the curve above. When you drag a handle, the connecting                   B1
               segment arcs away from the direction you drag.

                          A         A1
                                   AB        B2


                                        B
                                 B1


       58 Project 1: Composite Movie Ad

