


Page 46 - CC2017_WD_Look_Inside
P. 46
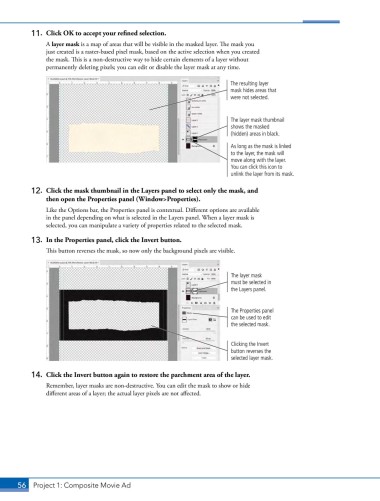
11.  Click OK to accept your refined selection.
               A layer mask is a map of areas that will be visible in the masked layer. The mask you
               just created is a raster-based pixel mask, based on the active selection when you created
               the mask. This is a non-destructive way to hide certain elements of a layer without
               permanently deleting pixels; you can edit or disable the layer mask at any time.


                                                                         The resulting layer
                                                                         mask hides areas that
                                                                         were not selected.


                                                                         The layer mask thumbnail
                                                                         shows the masked
                                                                         (hidden) areas in black.

                                                                         As long as the mask is linked
                                                                         to the layer, the mask will
                                                                         move along with the layer.
                                                                         You can click this icon to
                                                                         unlink the layer from its mask.

           12.  Click the mask thumbnail in the Layers panel to select only the mask, and
               then open the Properties panel (Window>Properties).
               Like the Options bar, the Properties panel is contextual. Different options are available
               in the panel depending on what is selected in the Layers panel. When a layer mask is
               selected, you can manipulate a variety of properties related to the selected mask.

           13.  In the Properties panel, click the Invert button.
               This button reverses the mask, so now only the background pixels are visible.


                                                                         The layer mask
                                                                         must be selected in
                                                                         the Layers panel.


                                                                         The Properties panel
                                                                         can be used to edit
                                                                         the selected mask.


                                                                         Clicking the Invert
                                                                         button reverses the
                                                                         selected layer mask.

           14.  Click the Invert button again to restore the parchment area of the layer.
               Remember, layer masks are non-destructive. You can edit the mask to show or hide
               different areas of a layer; the actual layer pixels are not affected.


       56 Project 1: Composite Movie Ad

