


Page 37 - CC2017_WD_Look_Inside
P. 37
Stage 3  Creating Silhouettes


              At this stage of the project, you have a single file that contains all of the necessary graphic elements,
              but you still have a few issues to resolve: the images are stacked on top of one another, some images
              don’t fit into the page area, and some images have border edges that don’t fit into the overall design
              (the blue background around the quill, for example). In this stage, you start fixing these problems.
                 Virtually any Photoshop project involves making some kind of selection. Making selections is so
              important, in fact, that there are no fewer than nine tools dedicated specifically to making selections,
              as well as a whole Select menu and a few other options for making and refining selections.
                 In an earlier lesson you learned how to use the marquee and lasso tools to draw selections. In
              the next series of exercises, you use several other selection methods to isolate the graphics from their
              backgrounds (called silhouetting).


                  trAnsform A lAyer
              Before you start silhouetting the different elements of the ad, it’s a good idea to
              make them fit into the page area. Photoshop makes scaling, rotating, and other
              transformations fairly easy to implement.

                1.  With forefathers.psd open, choose View>Fit on Screen.

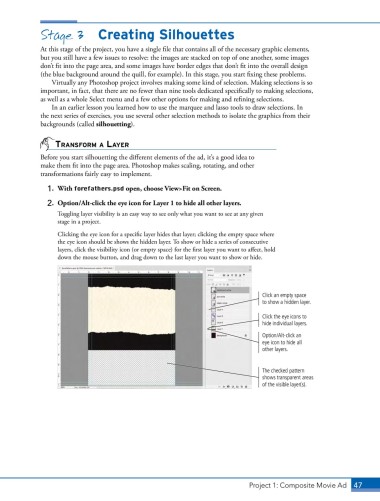
                2.  Option/Alt-click the eye icon for Layer 1 to hide all other layers.
                   Toggling layer visibility is an easy way to see only what you want to see at any given
                   stage in a project.

                   Clicking the eye icon for a specific layer hides that layer; clicking the empty space where
                   the eye icon should be shows the hidden layer. To show or hide a series of consecutive
                   layers, click the visibility icon (or empty space) for the first layer you want to affect, hold
                   down the mouse button, and drag down to the last layer you want to show or hide.


                                                                                   Click an empty space
                                                                                   to show a hidden layer.

                                                                                   Click the eye icons to
                                                                                   hide individual layers.

                                                                                   Option/Alt-click an
                                                                                   eye icon to hide all
                                                                                   other layers.


                                                                                   The checked pattern
                                                                                   shows transparent areas
                                                                                   of the visible layer(s).


                                                                               Project 1: Composite Movie Ad    47

