


Page 40 - CC2017_WD_Look_Inside
P. 40
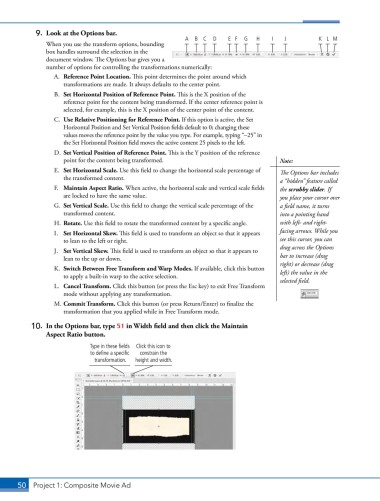
9.  Look at the Options bar.
                                                           A  B C   D   E F  G   H    I   J          K L M
               When you use the transform options, bounding
               box handles surround the selection in the
               document window. The Options bar gives you a
               number of options for controlling the transformations numerically:
                  A.  Reference Point Location. This point determines the point around which
                     transformations are made. It always defaults to the center point.
                  B.  Set Horizontal Position of Reference Point. This is the X position of the
                     reference point for the content being transformed. If the center reference point is
                     selected, for example, this is the X position of the center point of the content.
                  C.  Use Relative Positioning for Reference Point. If this option is active, the Set
                     Horizontal Position and Set Vertical Position fields default to 0; changing these
                     values moves the reference point by the value you type. For example, typing “–25” in
                     the Set Horizontal Posi tion field moves the active content 25 pixels to the left.
                  D.  Set Vertical Position of Reference Point. This is the Y position of the reference
                     point for the content being transformed.                           Note:
                  E.  Set Horizontal Scale. Use this field to change the horizontal scale percentage of   The Options bar includes
                     the transformed content.
                                                                                        a “hidden” feature called
                  F.  Maintain Aspect Ratio. When active, the horizontal scale and vertical scale fields   the scrubby slider. If
                     are locked to have the same value.                                 you place your cursor over
                  G.  Set Vertical Scale. Use this field to change the vertical scale percentage of the   a field name, it turns
                     transformed content.                                               into a pointing hand
                  H. Rotate. Use this field to rotate the transformed content by a specific angle.  with left- and right-
                  I.  Set Horizontal Skew. This field is used to transform an object so that it appears   facing arrows. While you
                     to lean to the left or right.                                      see this cursor, you can
                                                                                        drag across the Options
                  J.  Set Vertical Skew. This field is used to transform an object so that it appears to
                     lean to the up or down.                                            bar to increase (drag
                                                                                        right) or decrease (drag
                  K.  Switch Between Free Transform and Warp Modes. If available, click this button   left) the value in the
                     to apply a built-in warp to the active selection.
                                                                                        selected field.
                  L.  Cancel Transform. Click this button (or press the Esc key) to exit Free Transform
                     mode without applying any transformation.
                  M. Commit Transform. Click this button (or press Return/Enter) to finalize the
                     transformation that you applied while in Free Transform mode.

           10.  In the Options bar, type 51 in Width field and then click the Maintain
               Aspect Ratio button.

                             Type in these fields   Click this icon to
                             to define a specific   constrain the
                               transformation.  height and width.


       50 Project 1: Composite Movie Ad

