
Page 63 - Demo
P. 63
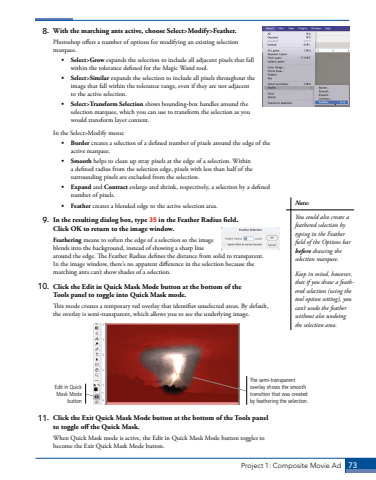
Project 1: Composite Movie Ad 738. With the marching ants active, choose Select>Modify>Feather.Photoshop offers a number of options for modifying an existing selection marquee. %u2022 Select>Grow expands the selection to include all adjacent pixels that fall within the tolerance defined for the Magic Wand tool.%u2022 Select>Similar expands the selection to include all pixels throughout the image that fall within the tolerance range, even if they are not adjacent to the active selection.%u2022 Select>Transform Selection shows bounding-box handles around the selection marquee, which you can use to transform the selection as you would transform layer content.In the Select>Modify menu: %u2022 Border creates a selection of a defined number of pixels around the edge of the active marquee.%u2022 Smooth helps to clean up stray pixels at the edge of a selection. Within a defined radius from the selection edge, pixels with less than half of the surrounding pixels are excluded from the selection.%u2022 Expand and Contract enlarge and shrink, respectively, a selection by a defined number of pixels.%u2022 Feather creates a blended edge to the active selection area.9. In the resulting dialog box, type 35 in the Feather Radius field. Click OK to return to the image window.Feathering means to soften the edge of a selection so the image blends into the background, instead of showing a sharp line around the edge. The Feather Radius defines the distance from solid to transparent. In the image window, there%u2019s no apparent difference in the selection because the marching ants can%u2019t show shades of a selection. 10. Click the Edit in Quick Mask Mode button at the bottom of the Tools panel to toggle into Quick Mask mode.This mode creates a temporary red overlay that identifies unselected areas. By default, the overlay is semi-transparent, which allows you to see the underlying image. Edit in Quick Mask Mode buttonThe semi-transparent overlay shows the smooth transition that was created by feathering the selection.11. Click the Exit Quick Mask Mode button at the bottom of the Tools panel to toggle off the Quick Mask.When Quick Mask mode is active, the Edit in Quick Mask Mode button toggles to become the Exit Quick Mask Mode button.Note:You could also create a feathered selection by typing in the Feather field of the Options bar before drawing the selection marquee.Keep in mind, however, that if you draw a feathered selection (using the tool option setting), you can%u2019t undo the feather without also undoing the selection area.
