


Page 52 - CC2018_ID_Look_Inside
P. 52
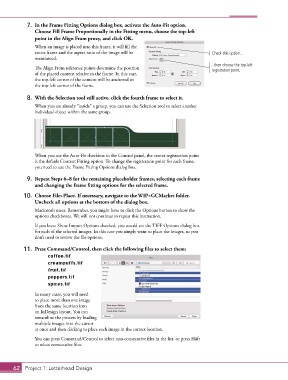
7.  In the Frame Fitting Options dialog box, activate the Auto-Fit option.
               Choose Fill Frame Proportionally in the Fitting menu, choose the top-left
               point in the Align From proxy, and click OK.
               When an image is placed into this frame, it will fill the
               entire frame and the aspect ratio of the image will be                    Check this option...
               maintained.
                                                                                        ...then choose the top-left
               The Align From reference points determine the position                    registration point.
               of the placed content relative to the frame. In this case,
               the top-left corner of the content will be anchored to
               the top-left corner of the frame.

            8.  With the Selection tool still active, click the fourth frame to select it.
               When you are already “inside” a group, you can use the Selection tool to select another
               individual object within the same group.


               When you use the Auto-Fit checkbox in the Control panel, the center registration point
               is the default Content Fitting option. To change the registration point for each frame,
               you need to use the Frame Fitting Options dialog box.

            9.  Repeat Steps 6–8 for the remaining placeholder frames, selecting each frame
               and changing the frame fitting options for the selected frame.

           10.  Choose File>Place. If necessary, navigate to the WIP>GCMarket folder.
               Uncheck all options at the bottom of the dialog box.
               Macintosh users: Remember, you might have to click the Options button to show the
               options checkboxes. We will not continue to repeat this instruction.
               If you leave Show Import Options checked, you would see the TIFF Options dialog box
               for each of the selected images. In this case you simply want to place the images, so you
               don’t need to review the file options.

           11.  Press Command/Control, then click the following files to select them:

                     coffee.tif
                     creampuffs.tif
                     fruit.tif
                     peppers.tif
                     spices.tif
               In many cases, you will need
               to place more than one image
               from the same location into
               an InDesign layout. You can
               streamline the process by loading
               multiple images into the cursor
               at once and then clicking to place each image in the correct location.
               You can press Command/Control to select non-consecutive files in the list, or press Shift
               to select consecutive files.


       62 Project 1: Letterhead Design

