


Page 51 - CC2018_ID_Look_Inside
P. 51
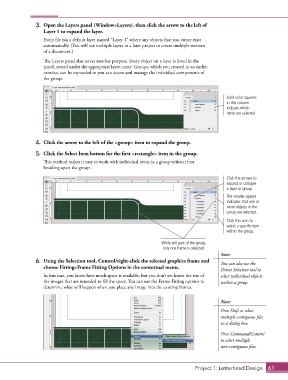
3.  Open the Layers panel (Window>Layers), then click the arrow to the left of
                   Layer 1 to expand the layer.

                   Every file has a default layer named “Layer 1” where any objects that you create exist
                   automatically. (You will use multiple layers in a later project to create multiple versions
                   of a document.)

                   The Layers panel also serves another purpose. Every object on a layer is listed in the
                   panel, nested under the appropriate layer name. Groups, which you created in an earlier
                   exercise, can be expanded so you can access and manage the individual components of
                   the group.


                                                                                               Solid-color squares
                                                                                               in this column
                                                                                               indicate which
                                                                                               items are selected.


                4.  Click the arrow to the left of the <group> item to expand the group.

                5.  Click the Select Item button for the first <rectangle> item in the group.
                   This method makes it easy to work with individual items in a group without first
                   breaking apart the group.

                                                                                               Click the arrows to
                                                                                               expand or collapse
                                                                                               a layer or group.
                                                                                               The smaller square
                                                                                               indicates that one or
                                                                                               more objects in the
                                                                                               group are selected.
                                                                                               Click this icon to
                                                                                               select a specific item
                                                                                               within the group.

                                                                    While still part of the group,
                                                                    only one frame is selected.
                                                                                            Note:
                 6.  Using the Selection tool, Control/right-click the selected graphics frame and   You can also use the
                   choose Fitting>Frame Fitting Options in the contextual menu.
                                                                                            Direct Selection tool to
                   In this case, you know how much space is available, but you don’t yet know the size of   select individual objects
                   the images that are intended to fill the space. You can use the Frame Fitting options to   within a group.
                   determine what will happen when you place any image into the existing frames.


                                                                                            Note:
                                                                                            Press Shift to select
                                                                                            multiple contiguous files
                                                                                            in a dialog box.

                                                                                            Press Command/Control
                                                                                            to select multiple
                                                                                            non-contiguous files.


                                                                                  Project 1: Letterhead Design  61

