


Page 24 - CC2017_ID_Look_Inside
P. 24
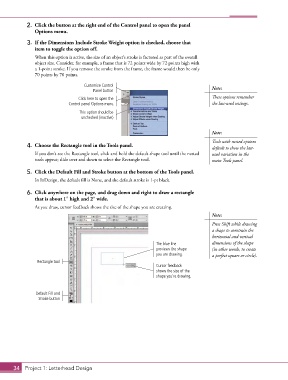
2.  Click the button at the right end of the Control panel to open the panel
               Options menu.

            3.  If the Dimensions Include Stroke Weight option is checked, choose that
               item to toggle the option off.
               When this option is active, the size of an object’s stroke is factored as part of the overall
               object size. Consider, for example, a frame that is 72 points wide by 72 points high with
               a 1-point stroke. If you remove the stroke from the frame, the frame would then be only
               70 points by 70 points.

                                    Customize Control
                                        Panel button                                    Note:
                                 Click here to open the                                 These options remember
                             Control panel Options menu.                                the last-used settings.
                                  This option should be
                                   unchecked (inactive).

                                                                                        Note:

                                                                                        Tools with nested options
            4.  Choose the Rectangle tool in the Tools panel.                           default to show the last-
               If you don’t see the Rectangle tool, click and hold the default shape tool until the nested   used variation in the
               tools appear; slide over and down to select the Rectangle tool.          main Tools panel.

            5.  Click the Default Fill and Stroke button at the bottom of the Tools panel.

               In InDesign, the default fill is None, and the default stroke is 1-pt black.

            6.  Click anywhere on the page, and drag down and right to draw a rectangle
               that is about 1″ high and 2″ wide.

               As you draw, cursor feedback shows the size of the shape you are creating.
                                                                                        Note:
                                                                                        Press Shift while drawing
                                                                                        a shape to constrain the
                                                                                        horizontal and vertical
                                                                 The blue line          dimensions of the shape
                                                                 previews the shape     (in other words, to create
                                                                 you are drawing.       a perfect square or circle).
                Rectangle tool
                                                                 Cursor feedback
                                                                 shows the size of the
                                                                 shape you’re drawing.


                Default Fill and
                 Stroke button


       34 Project 1: Letterhead Design

